> ## Documentation Index
> Fetch the complete documentation index at: https://docs.verbex.ai/llms.txt
> Use this file to discover all available pages before exploring further.
# Calendar Integration
> Connect your calendar with Verbex to manage appointments and check schedules
**What you'll learn**
* How to set up Cal.com integration
* How to configure calendar settings
* How to get required API credentials
# Overview
Calendar integration allows your AI assistant to check availability and schedule appointments in real-time. This integration uses Cal.com as the centralized calendar manager, supporting various calendar services like Google Calendar and Outlook.
# Prerequisites
Before setting up calendar integration, ensure you have:
* A Cal.com account
* Access to your preferred calendar (Google Calendar, Outlook, etc.)
* Admin access to your Verbex assistant
# Setup Guide
## Step 1: Create Cal.com Account
1. Visit [Cal.com](https://cal.com/)
2. Sign up or sign in with your email address
3. Access the dashboard
## Step 2: Connect Your Calendar
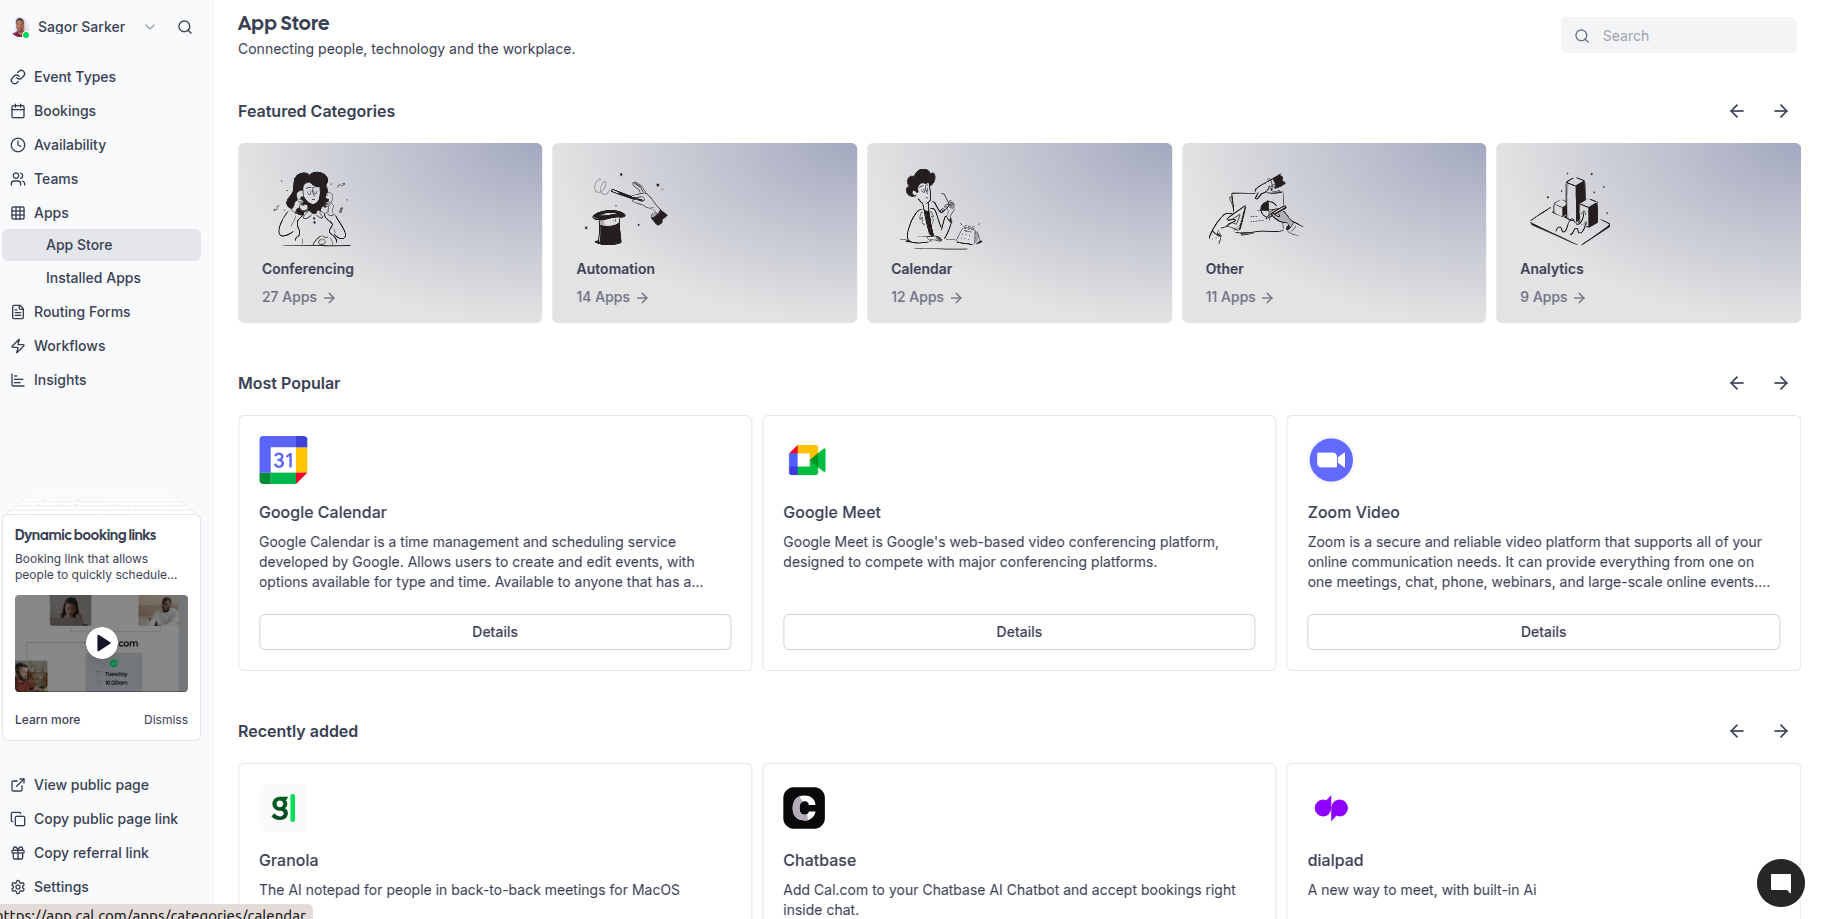
1. In the Cal.com dashboard, click "Apps" in the left panel
2. Choose your calendar service (e.g., Google Calendar)
3. Follow the connection prompts
 ## Step 3: Create API Key
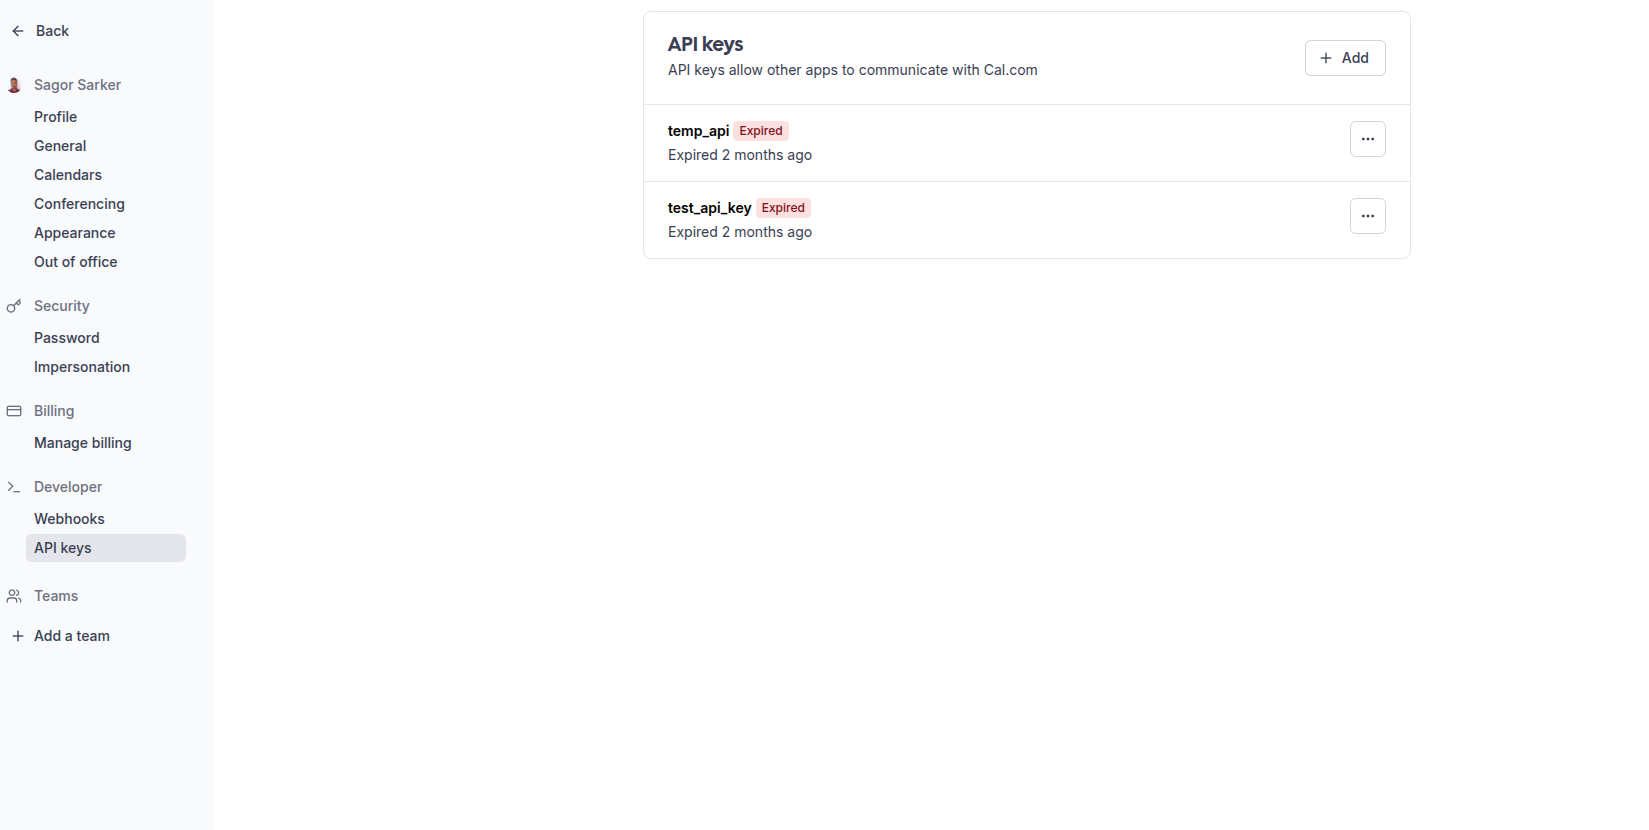
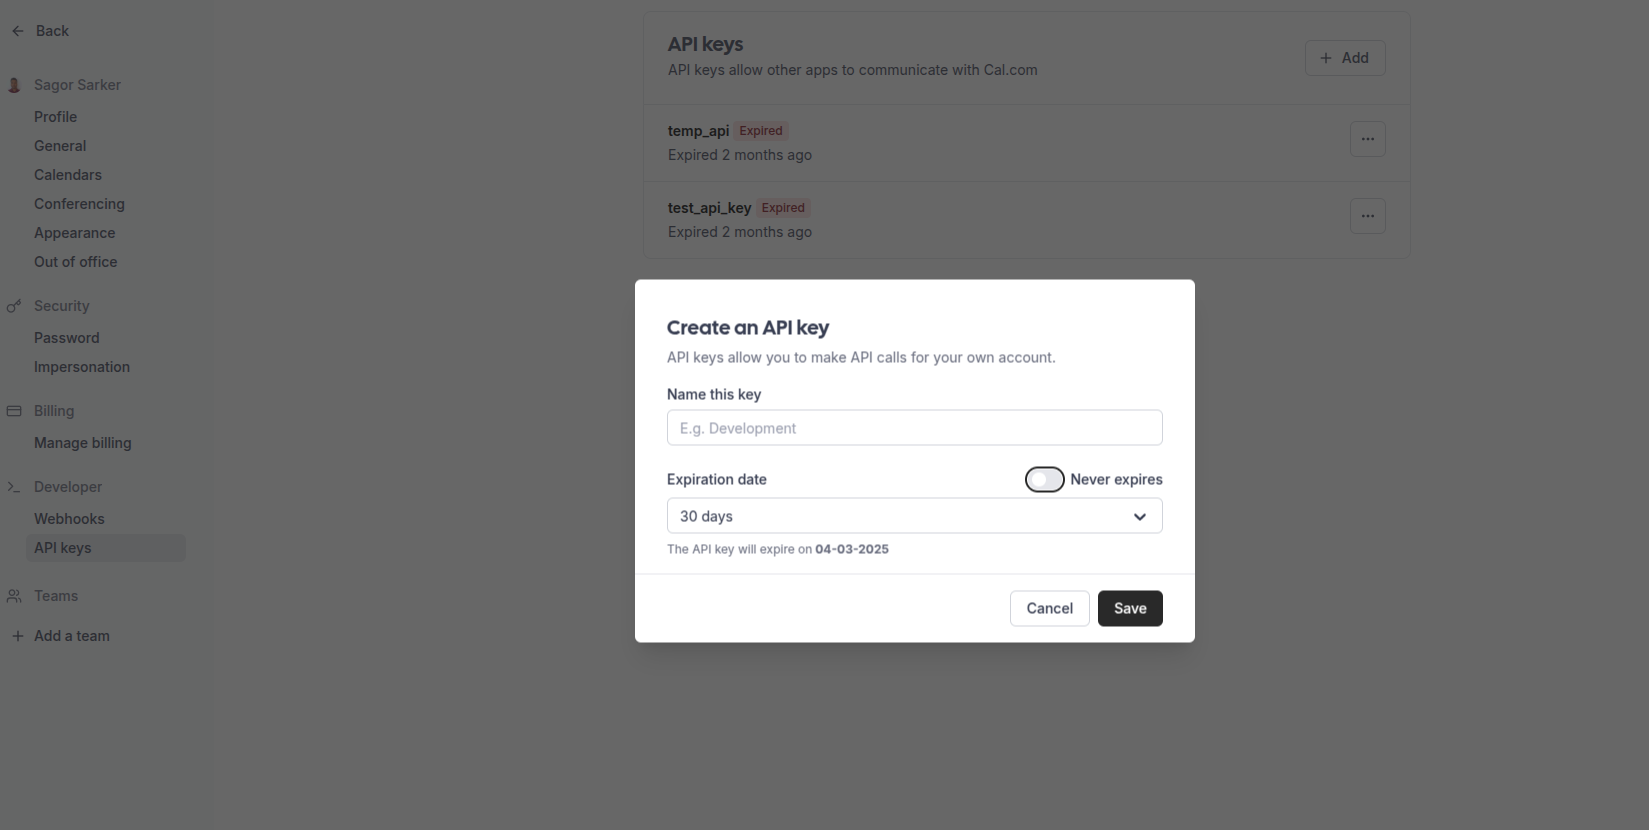
1. Click "Settings" in the bottom left corner
2. Select "API Keys" from the left panel
3. Click "Add API Key"
4. Copy and save the generated API key
Store your API key securely - you'll need it to connect with Verbex.
## Step 3: Create API Key
1. Click "Settings" in the bottom left corner
2. Select "API Keys" from the left panel
3. Click "Add API Key"
4. Copy and save the generated API key
Store your API key securely - you'll need it to connect with Verbex.
 ## Step 4: Set Up Event Type
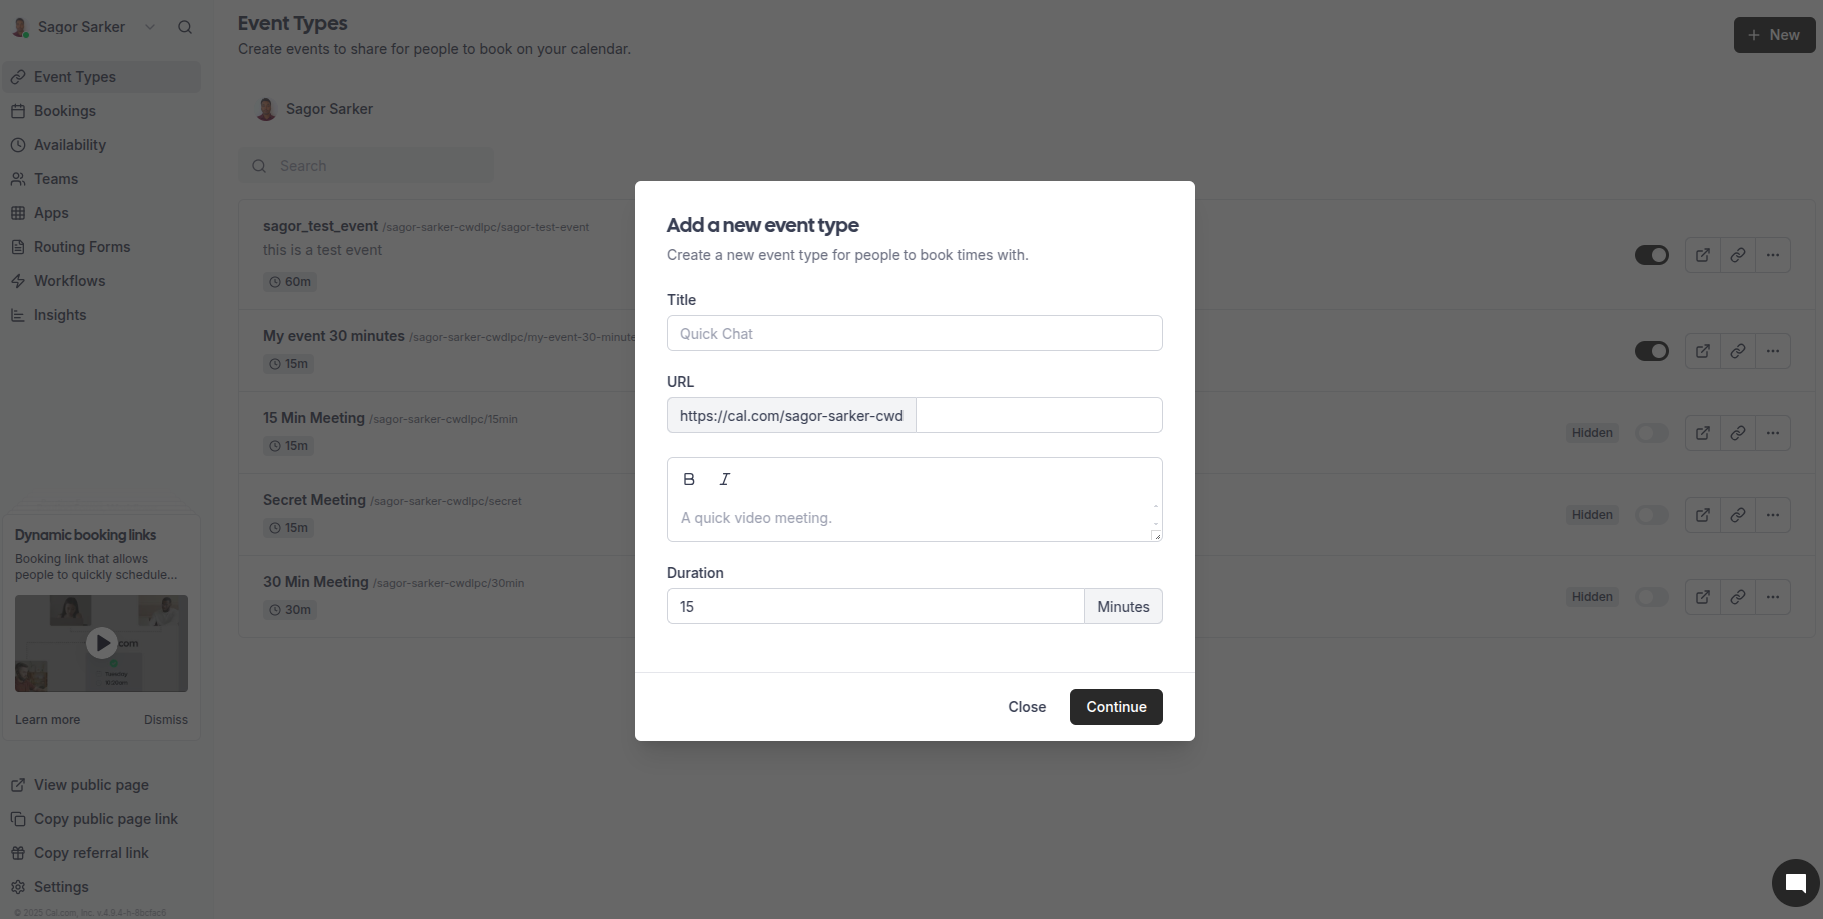
1. Click "Event Types" in the left panel
2. Click "+ New" to create an event type
3. Fill in the event details:
* **Title**: Name your event type (e.g., "Customer Consultation")
* **Description**: Write a clear description of the meeting purpose
* **Duration**: Select your preferred duration from the dropdown menu
4. Click "Continue" to save your event type
Create different event types for different purposes:
* Quick 15-minute consultations
* 30-minute product demos
* 1-hour strategy sessions
Keep your event type names descriptive and clear. You'll need to reference these when setting up the integration with Verbex.
## Step 4: Set Up Event Type
1. Click "Event Types" in the left panel
2. Click "+ New" to create an event type
3. Fill in the event details:
* **Title**: Name your event type (e.g., "Customer Consultation")
* **Description**: Write a clear description of the meeting purpose
* **Duration**: Select your preferred duration from the dropdown menu
4. Click "Continue" to save your event type
Create different event types for different purposes:
* Quick 15-minute consultations
* 30-minute product demos
* 1-hour strategy sessions
Keep your event type names descriptive and clear. You'll need to reference these when setting up the integration with Verbex.
 ## Step 5: Get Event Type ID
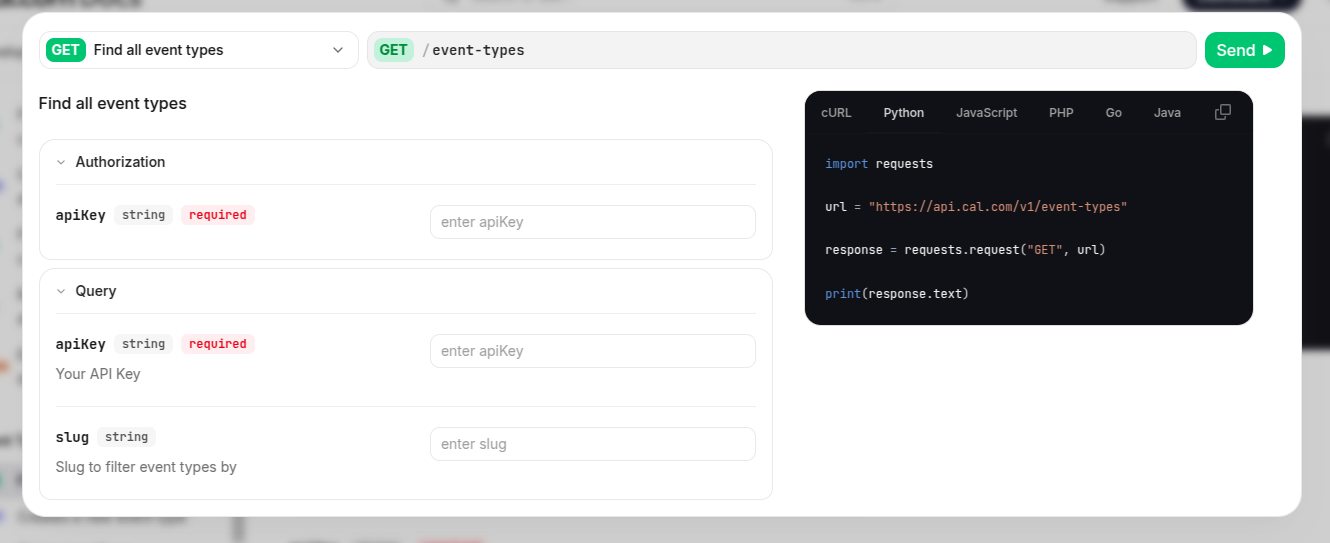
1. Visit [Cal.com API Documentation - Find All Event Types](https://cal.com/docs/api-reference/v1/event-types/find-all-event-types)
2. In the API documentation page:
* Locate the authorization field
* Enter your API key that you copied earlier
* Click the "Send" button
## Step 5: Get Event Type ID
1. Visit [Cal.com API Documentation - Find All Event Types](https://cal.com/docs/api-reference/v1/event-types/find-all-event-types)
2. In the API documentation page:
* Locate the authorization field
* Enter your API key that you copied earlier
* Click the "Send" button
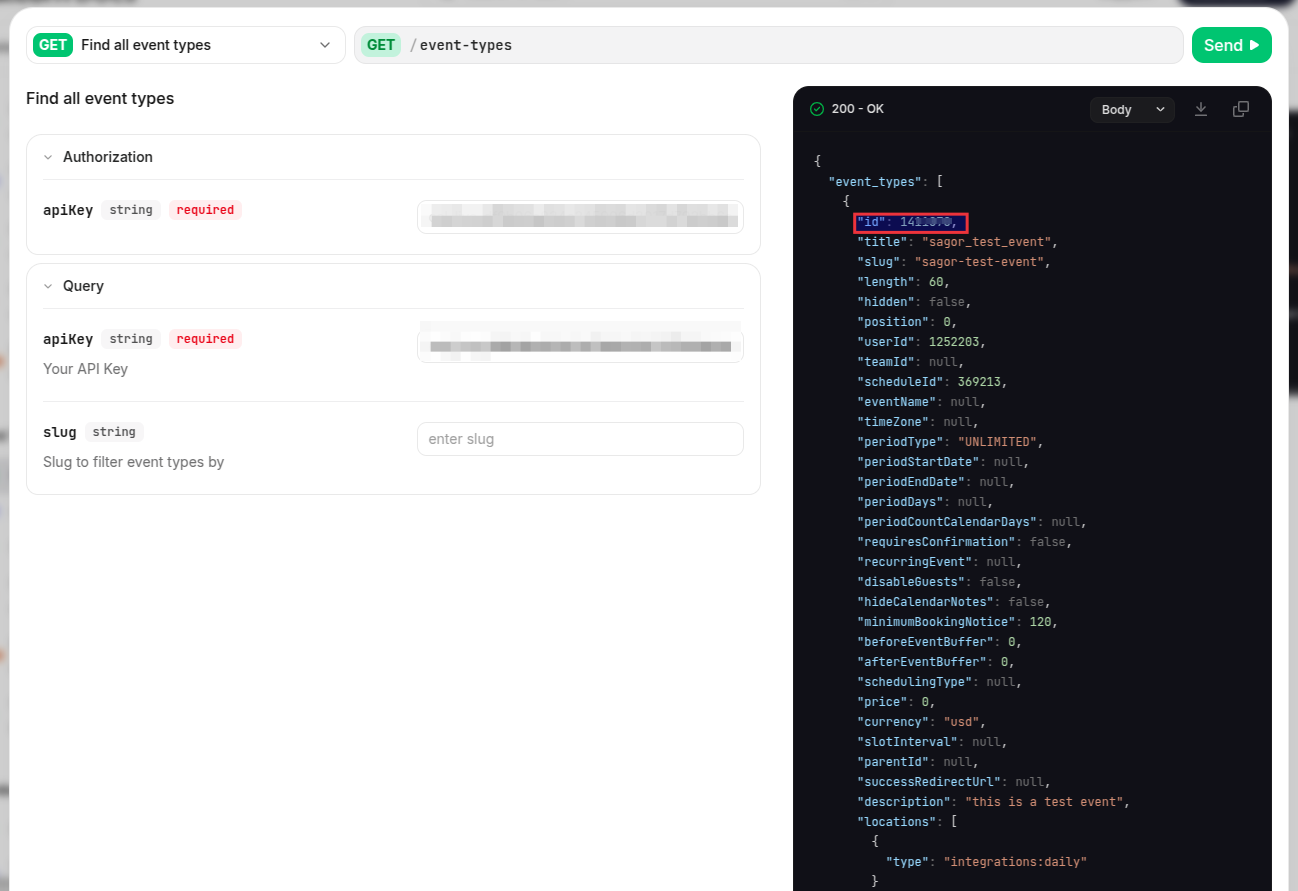
 3. Look for the response section below the "Find all event types"
4. You will see a list of all your event types with their corresponding IDs
5. Copy the ID of the event type you want to use with Verbex
3. Look for the response section below the "Find all event types"
4. You will see a list of all your event types with their corresponding IDs
5. Copy the ID of the event type you want to use with Verbex
 If you have multiple event types, double-check that you're copying the correct ID. Using the wrong Event Type ID will result in incorrect scheduling behavior.
# Configure in Verbex Platform
## Add Calendar Tool
1. Navigate to your AI assistant's configuration
2. Select "Tools"
3. If your AI Agent doesn't have the Calendar tool:
* Click "Add Tool" button
* Select "Calendar Integration" from the available tools
4. If it already has the tool:
* Click on the tool's edit icon to configure it
## Required Configuration
Fill in the following details:
1. **Cal.com API Key**
* Paste the API key you generated earlier
* Keep this key secure and don't share it
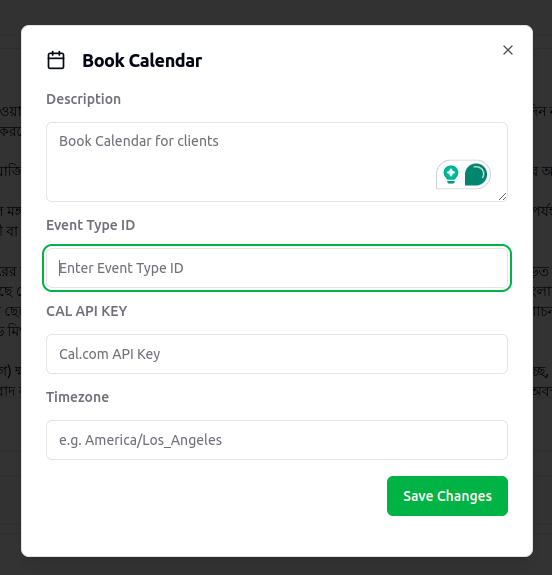
2. **Event Type ID**
* Add the Event Type ID you copied
* Make sure it matches the event type you want to use
3. **Time Zone**
* Format: "Region/City" (e.g., "Asia/Dhaka")
* Must match your operating timezone
The time zone format is case-sensitive. Make sure to use the exact format (e.g., "Asia/Dhaka", not "asia/dhaka").
If you have multiple event types, double-check that you're copying the correct ID. Using the wrong Event Type ID will result in incorrect scheduling behavior.
# Configure in Verbex Platform
## Add Calendar Tool
1. Navigate to your AI assistant's configuration
2. Select "Tools"
3. If your AI Agent doesn't have the Calendar tool:
* Click "Add Tool" button
* Select "Calendar Integration" from the available tools
4. If it already has the tool:
* Click on the tool's edit icon to configure it
## Required Configuration
Fill in the following details:
1. **Cal.com API Key**
* Paste the API key you generated earlier
* Keep this key secure and don't share it
2. **Event Type ID**
* Add the Event Type ID you copied
* Make sure it matches the event type you want to use
3. **Time Zone**
* Format: "Region/City" (e.g., "Asia/Dhaka")
* Must match your operating timezone
The time zone format is case-sensitive. Make sure to use the exact format (e.g., "Asia/Dhaka", not "asia/dhaka").
 ## Available Functions
The calendar integration provides two main functions that share the same configuration:
### 1. Check Availability
* Query available time slots
* Verify schedule conflicts
* Get real-time availability
* Uses the configured event type's duration and availability settings
### 2. Book Appointments
* Schedule new meetings
* Manage attendee information
* Send confirmations automatically
* Respects buffer times and availability rules set in Cal.com
Both functions use the same credentials (API Key, Event Type ID, and Time Zone) for consistency. Make sure your event type is properly configured in Cal.com with all necessary settings.
Remember to update your Event Type ID in Verbex if you make any changes to your event configuration in Cal.com.
For more details about API integration and advanced features, refer to the [Cal.com API Documentation](https://cal.com/docs/api-reference/v2/introduction).
## Available Functions
The calendar integration provides two main functions that share the same configuration:
### 1. Check Availability
* Query available time slots
* Verify schedule conflicts
* Get real-time availability
* Uses the configured event type's duration and availability settings
### 2. Book Appointments
* Schedule new meetings
* Manage attendee information
* Send confirmations automatically
* Respects buffer times and availability rules set in Cal.com
Both functions use the same credentials (API Key, Event Type ID, and Time Zone) for consistency. Make sure your event type is properly configured in Cal.com with all necessary settings.
Remember to update your Event Type ID in Verbex if you make any changes to your event configuration in Cal.com.
For more details about API integration and advanced features, refer to the [Cal.com API Documentation](https://cal.com/docs/api-reference/v2/introduction).