> ## Documentation Index
> Fetch the complete documentation index at: https://docs.verbex.ai/llms.txt
> Use this file to discover all available pages before exploring further.
# Salesforce Integration
> Connect your Verbex AI Assistant with Salesforce CRM
**What you'll learn**
* How to set up Salesforce API credentials
* How to create a Salesforce Connected App
* How to integrate Salesforce with Verbex Platform
* How to test and verify the integration
This guide will show you how to integrate Salesforce Lead Generation with your Verbex AI Assistant.
## Prerequisites
* A Salesforce account with administrative access
* Access to your Verbex AI Assistant
* Basic understanding of API integration
Let's walk through setting up a Salesforce lead generation integration.
## Step 1: Create Salesforce Connected App
1. Log into Salesforce
2. Navigate to Setup:
* Click the settings gear icon
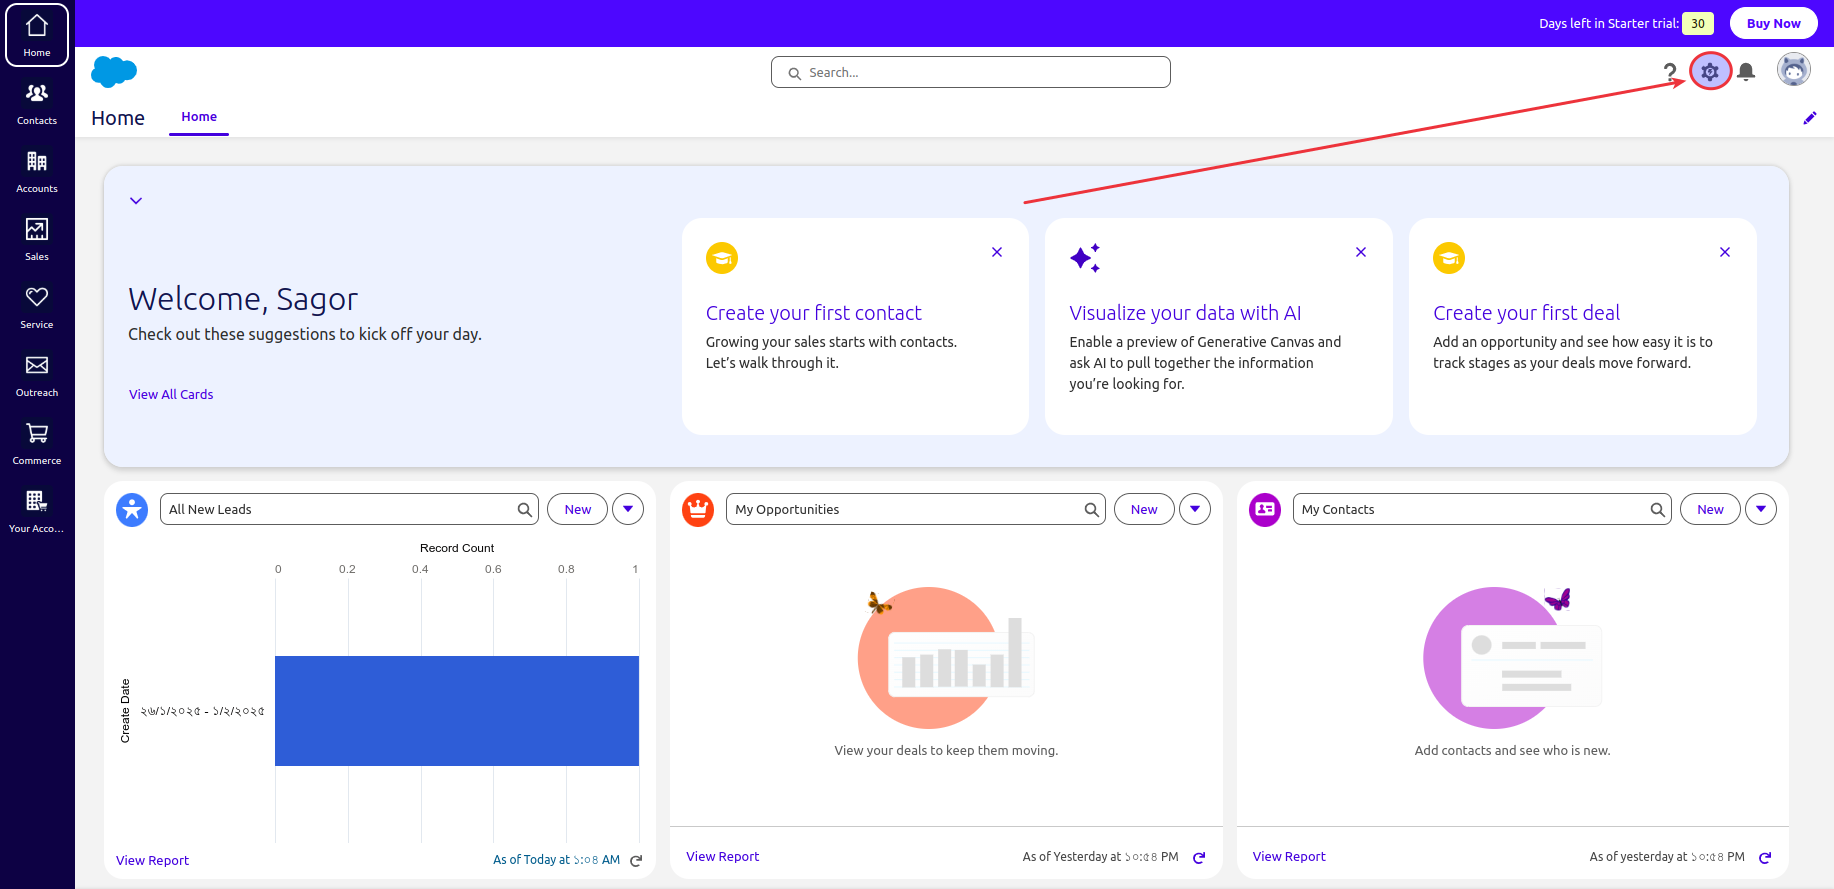 * Select "Open Advanced Setup"
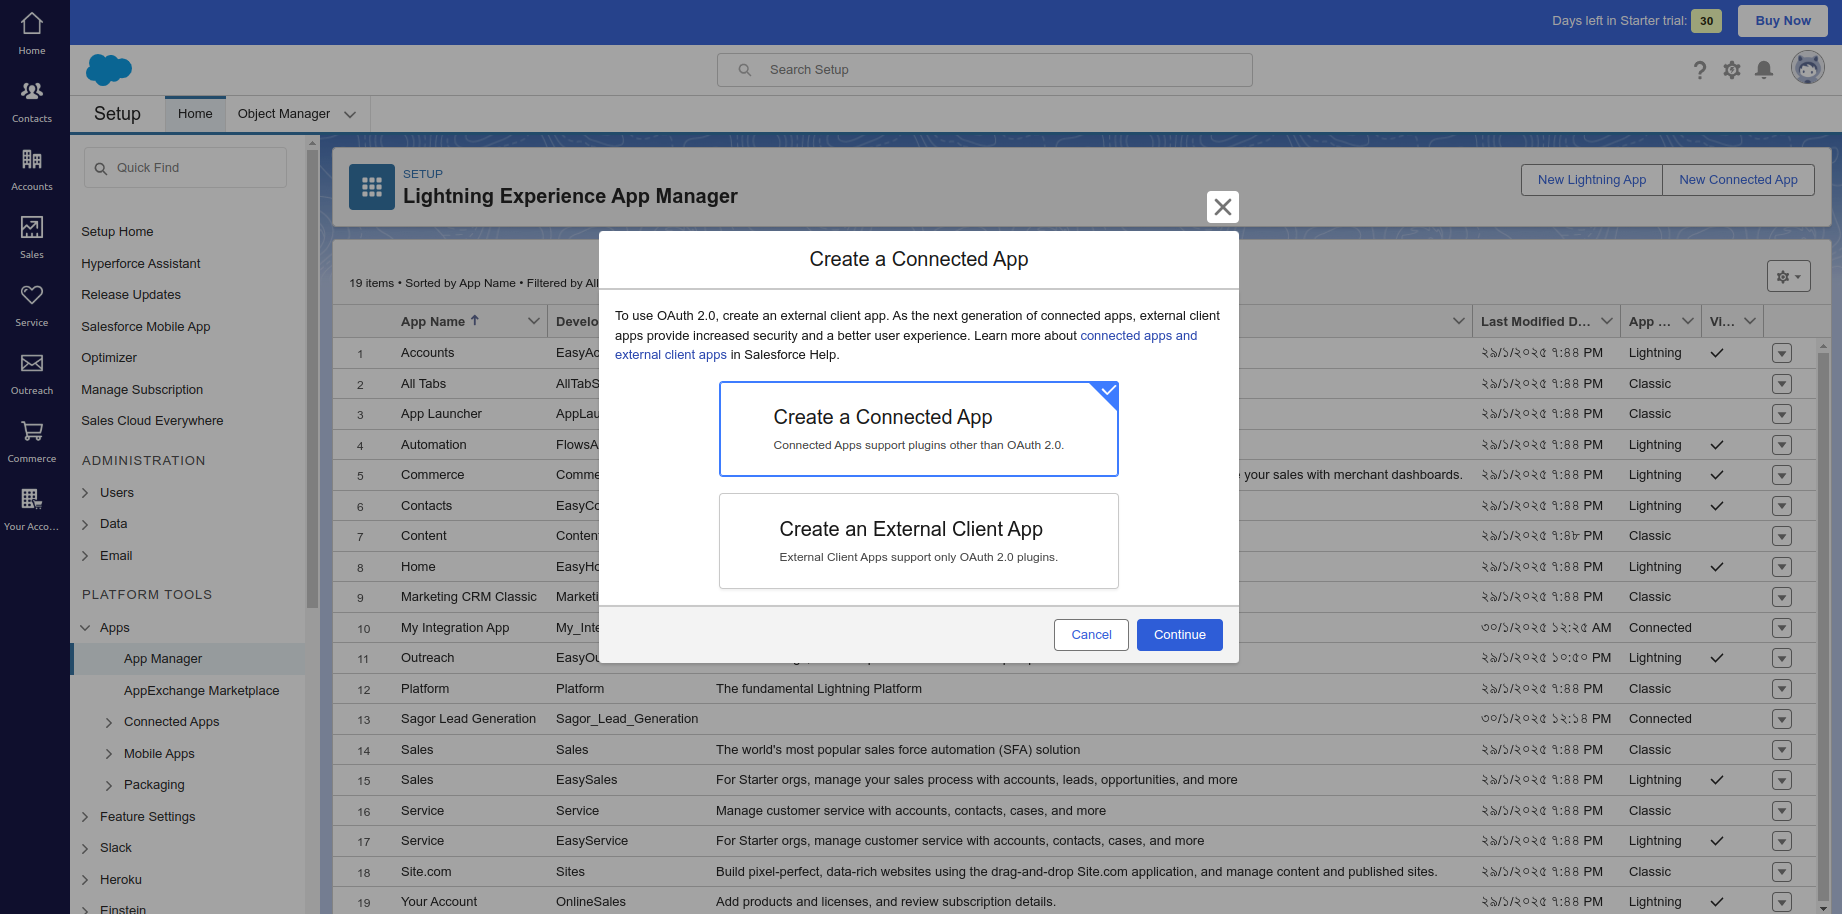
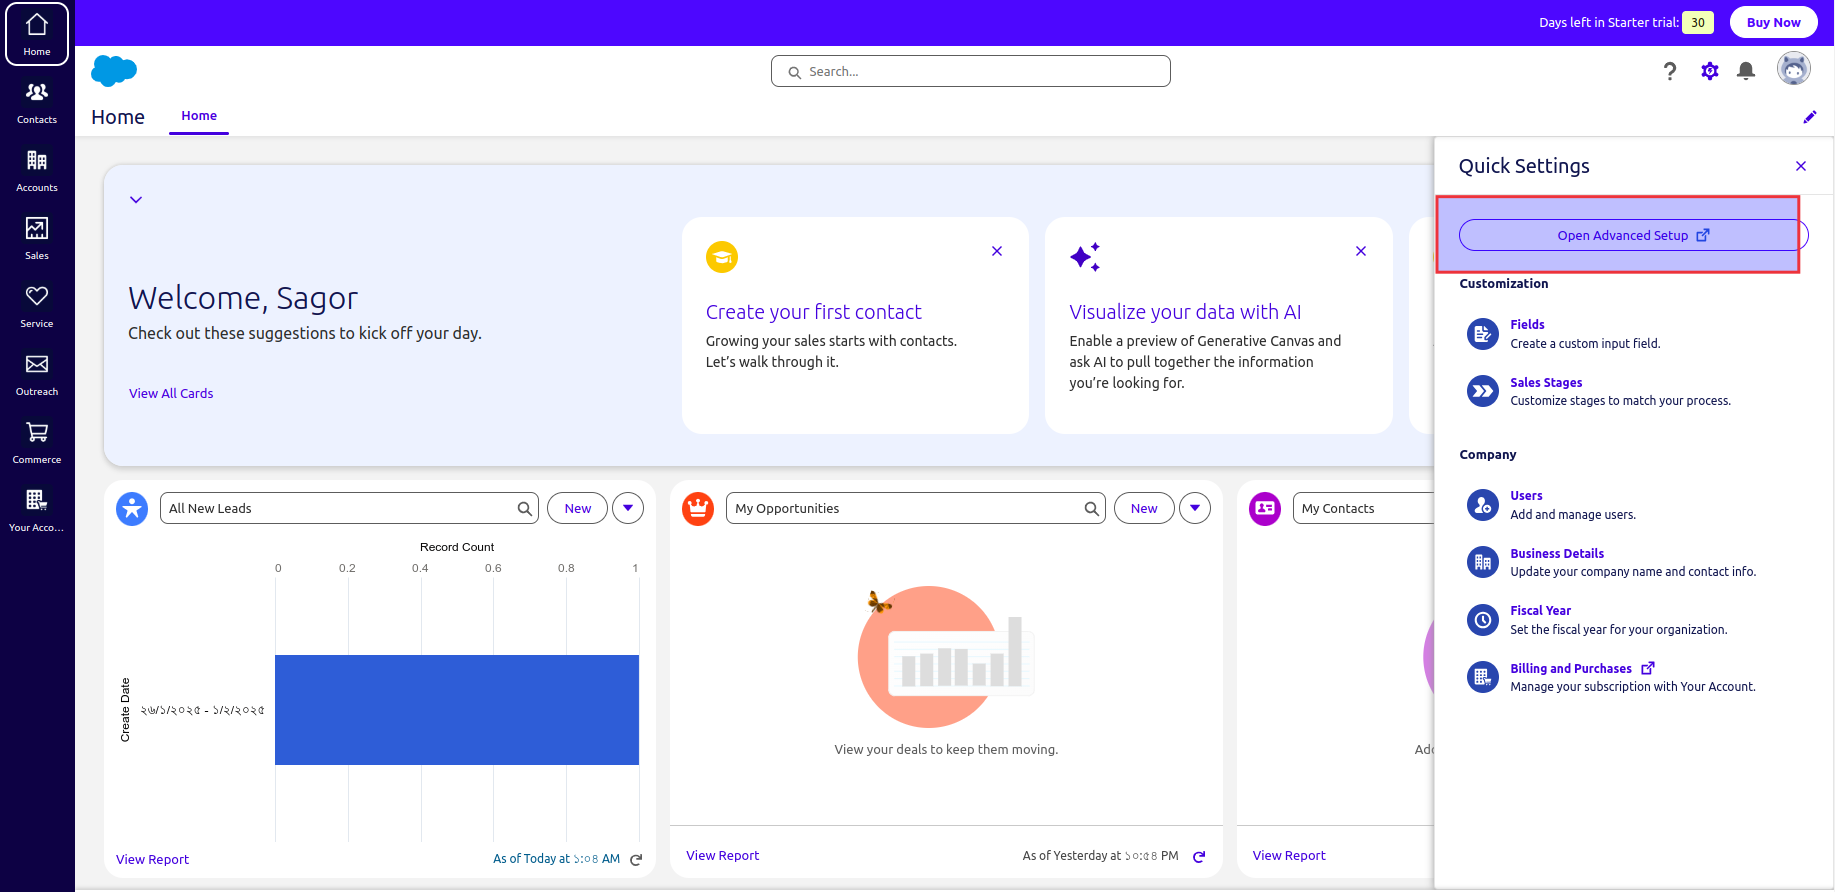 3. Create Connected App:
* Go to "App -> App Manager"
3. Create Connected App:
* Go to "App -> App Manager"
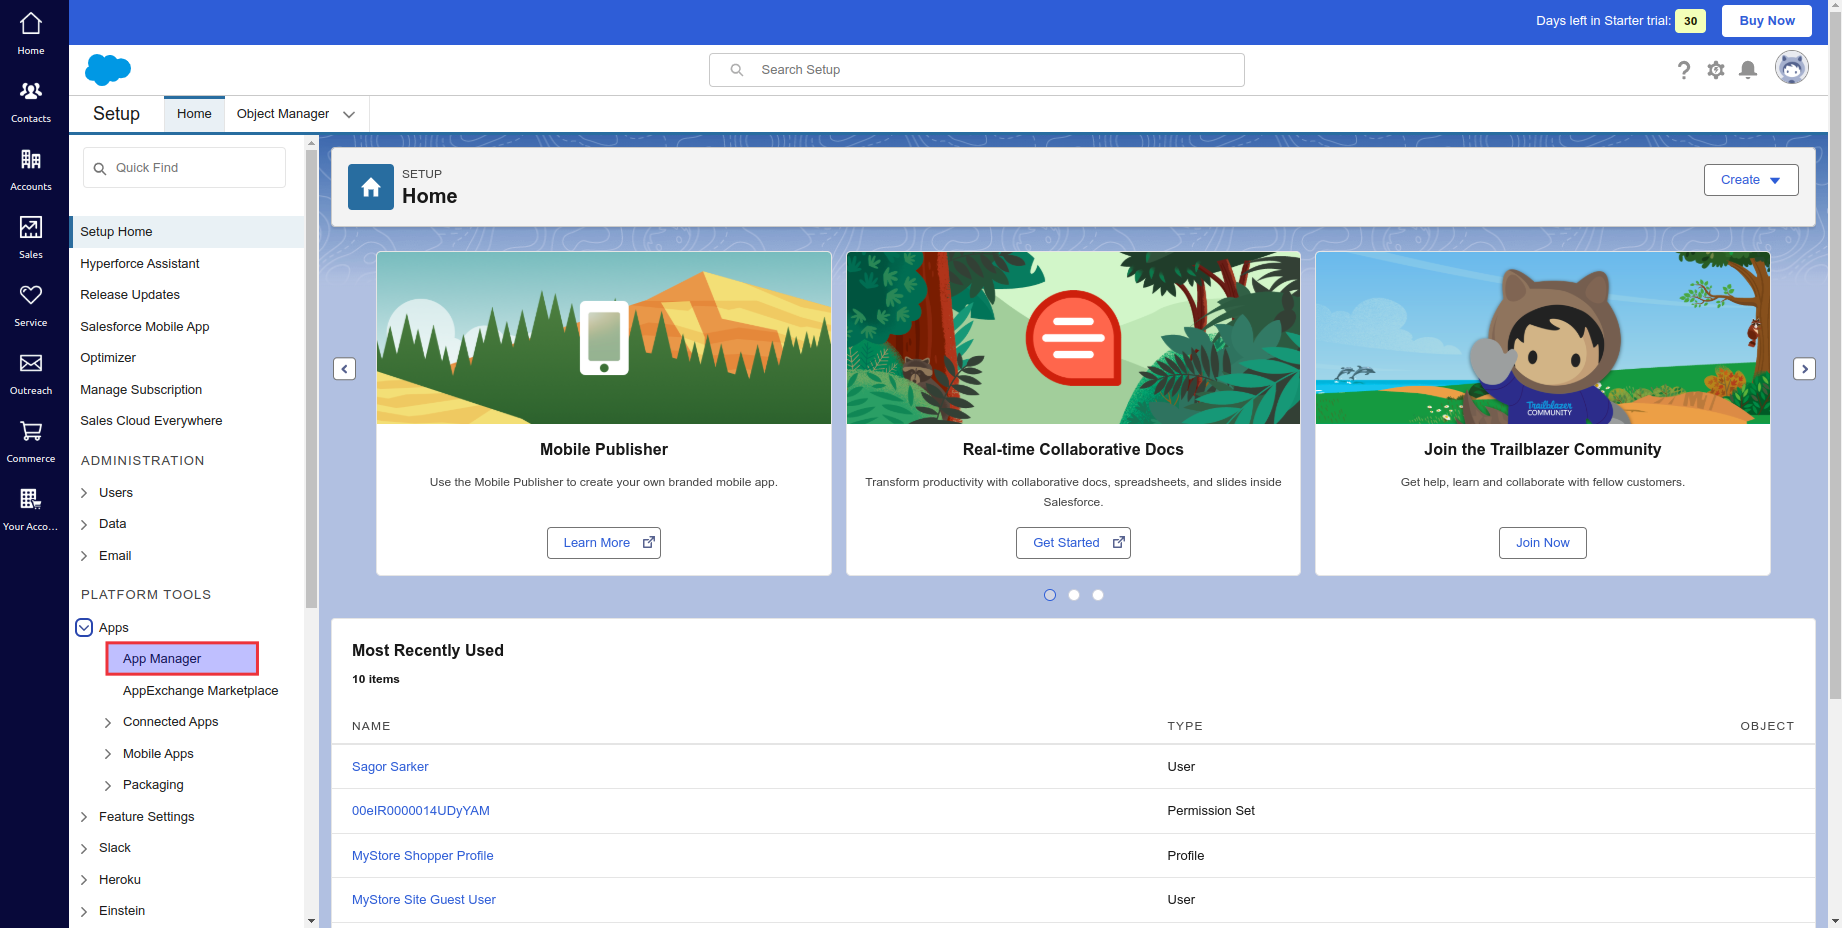 * Click "New Connected App"
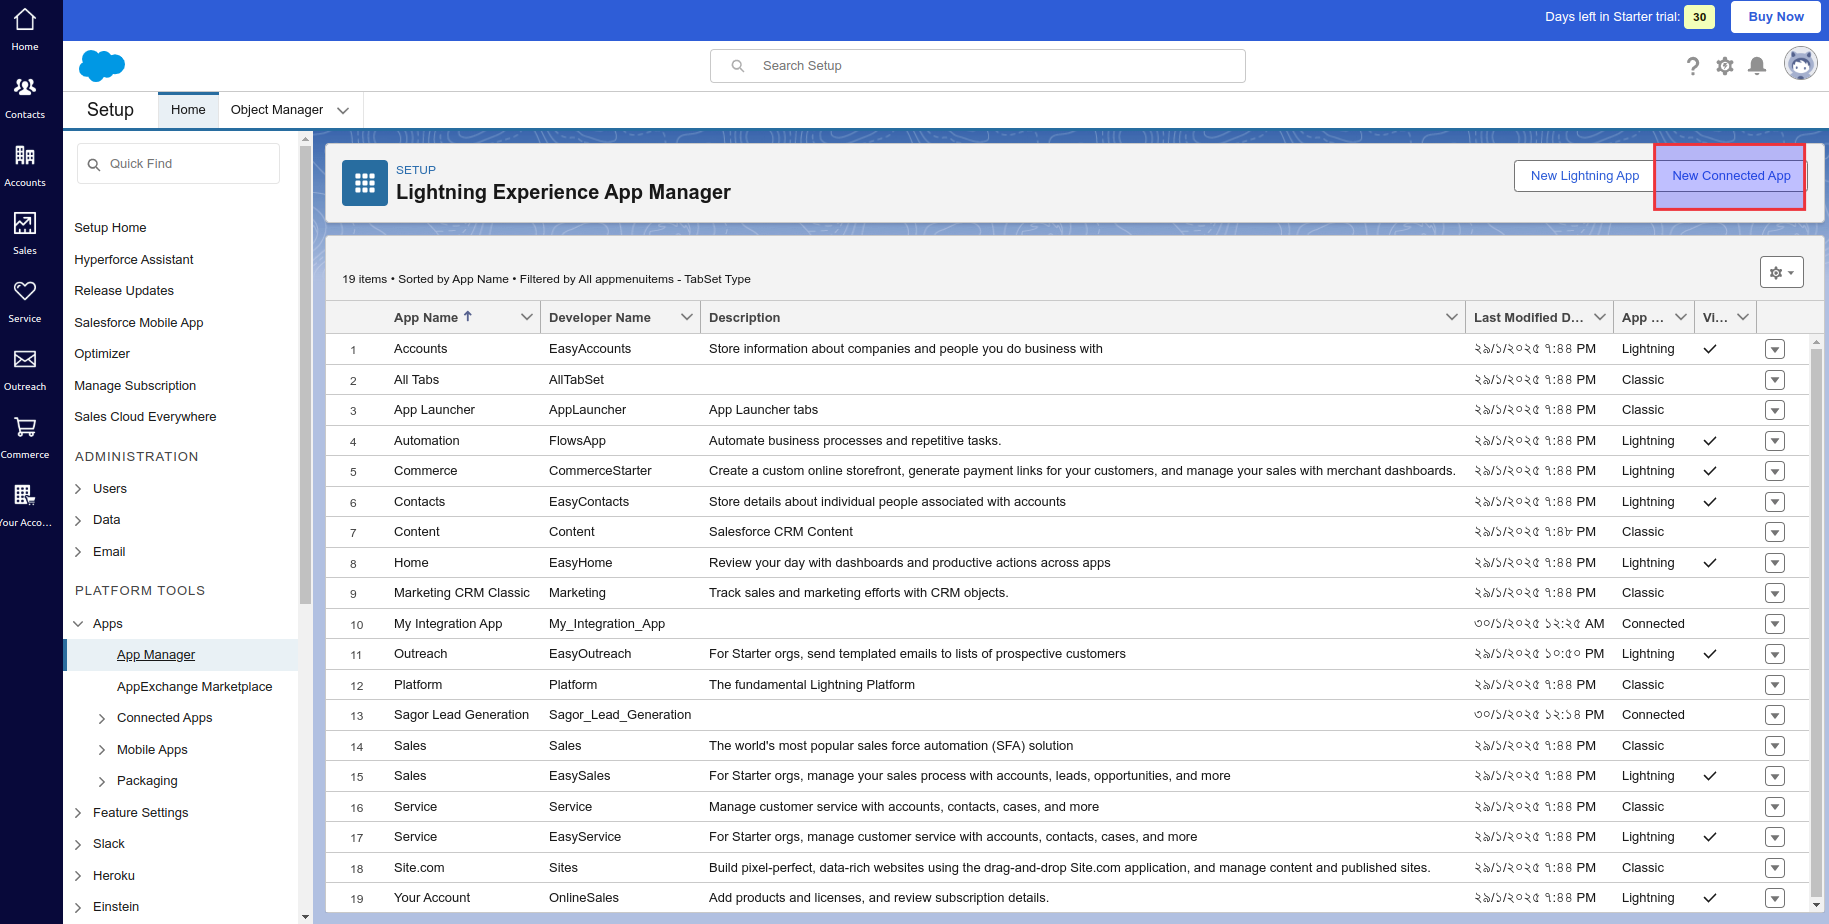 * Select "Create a Connected App"
 ## Step 2: Configure OAuth Settings
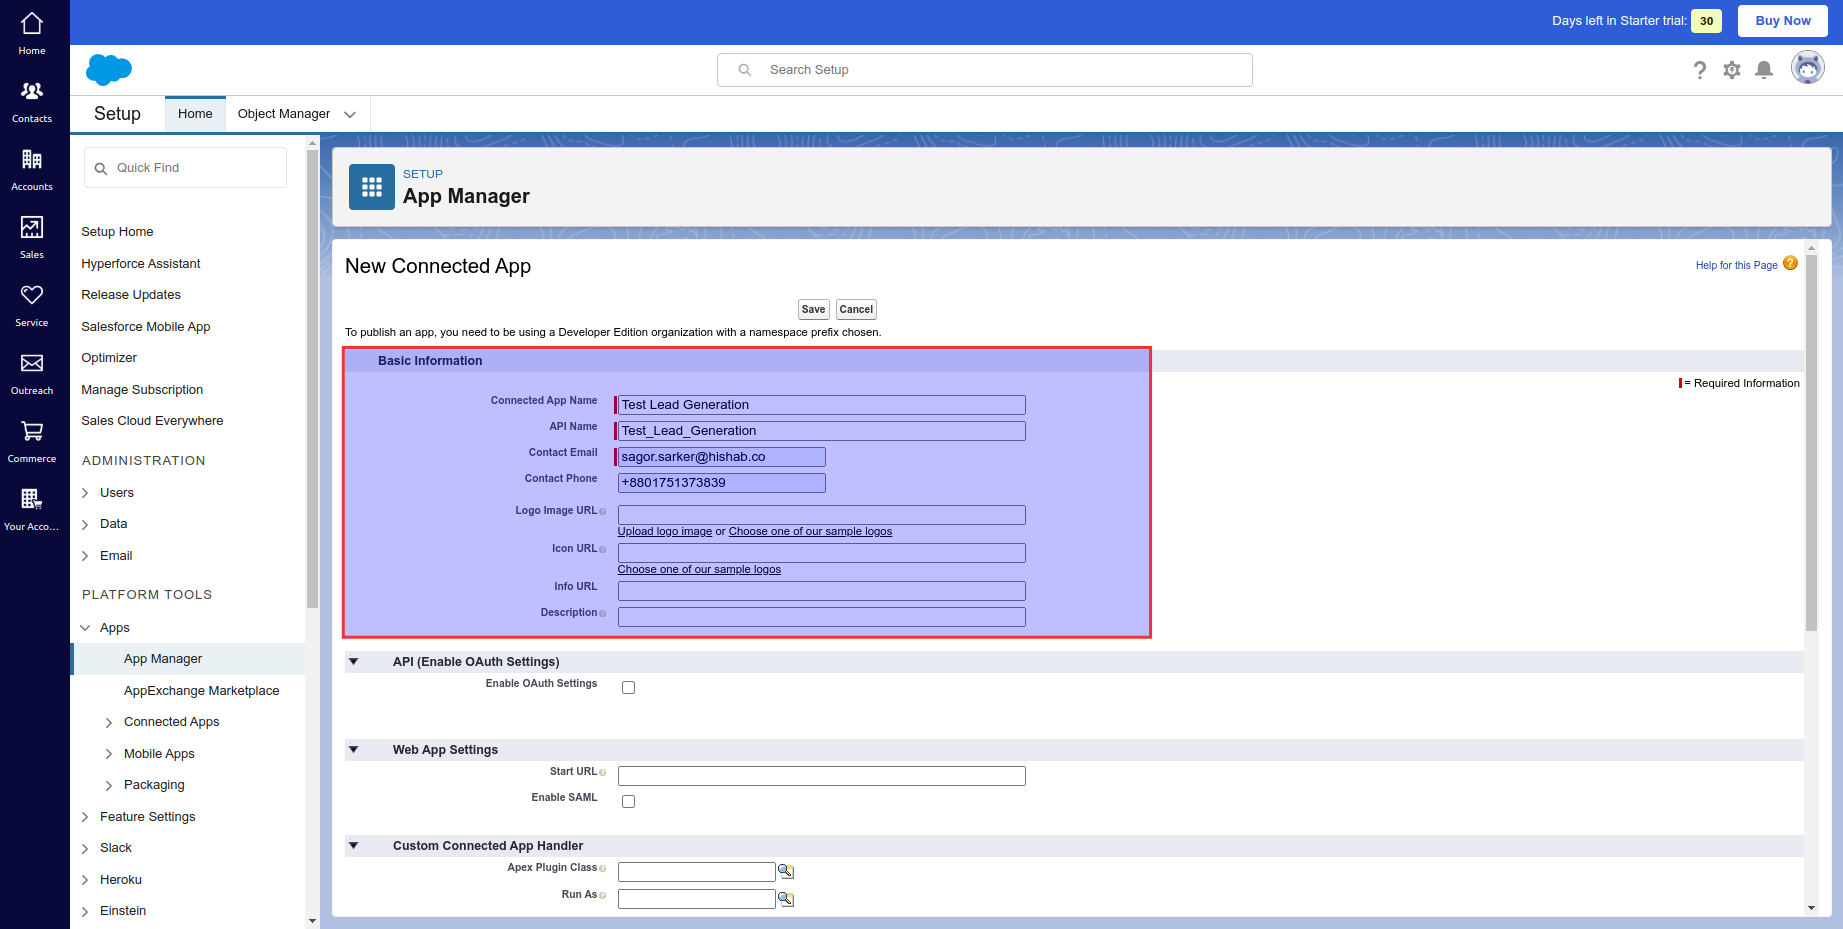
1. Fill in Basic Information
## Step 2: Configure OAuth Settings
1. Fill in Basic Information
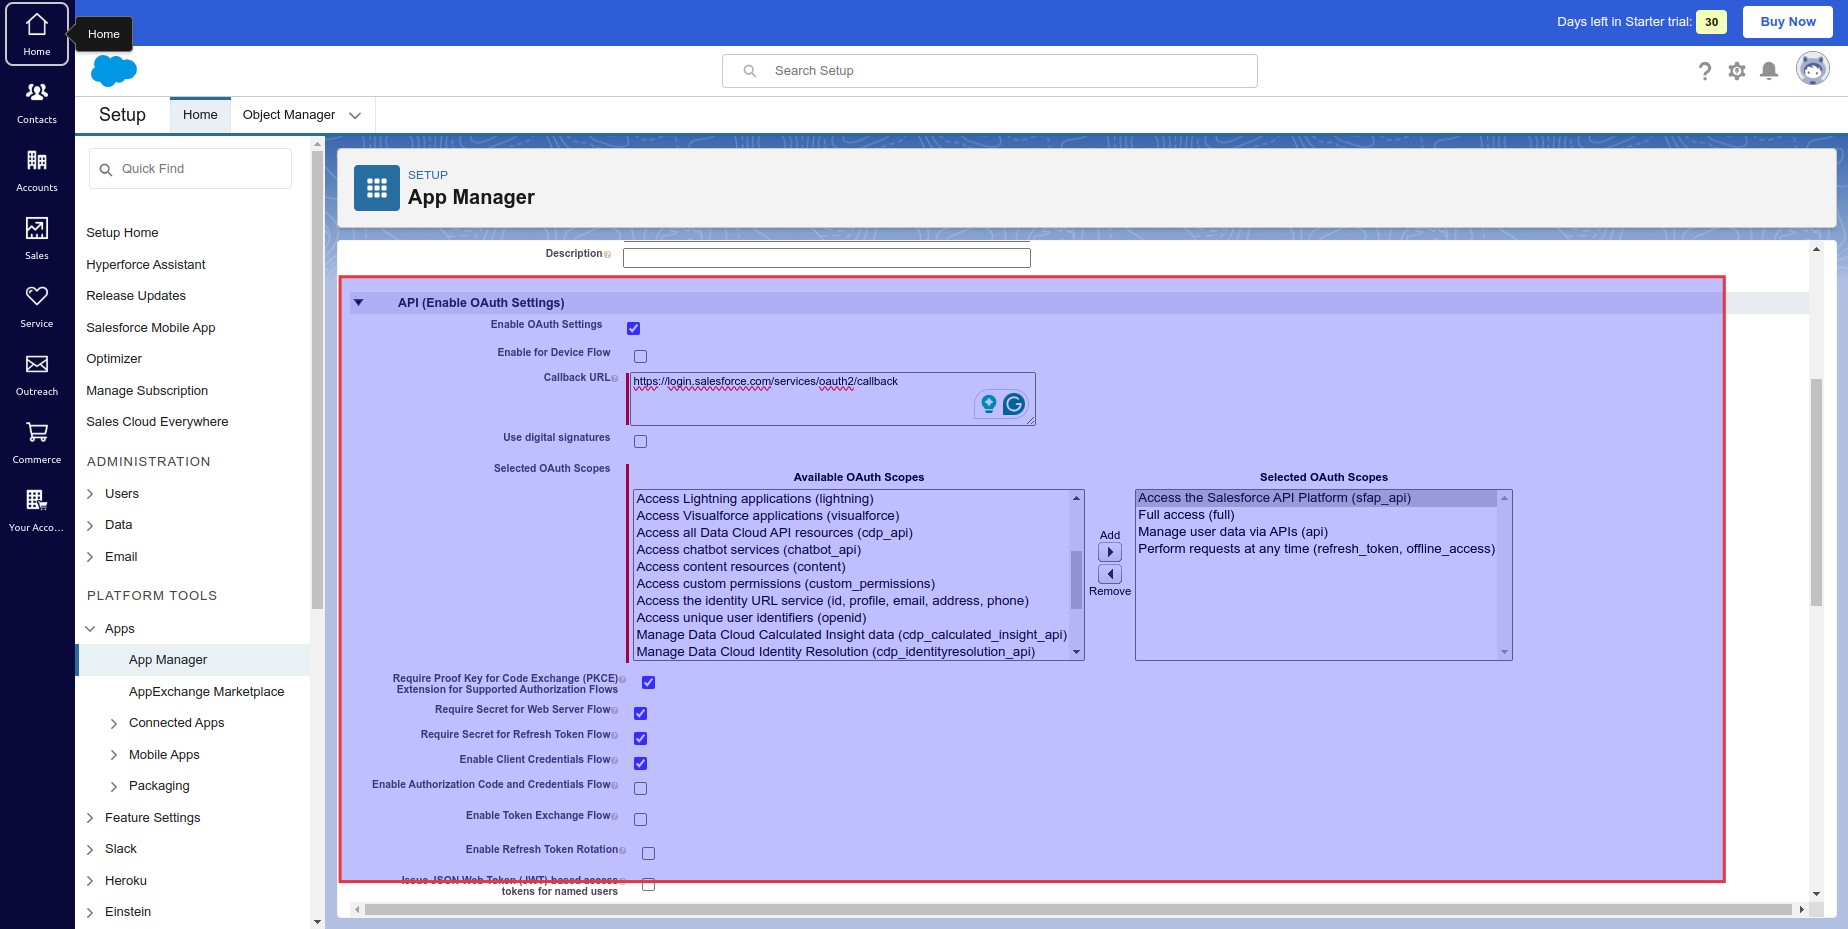
 2. Configure OAuth settings
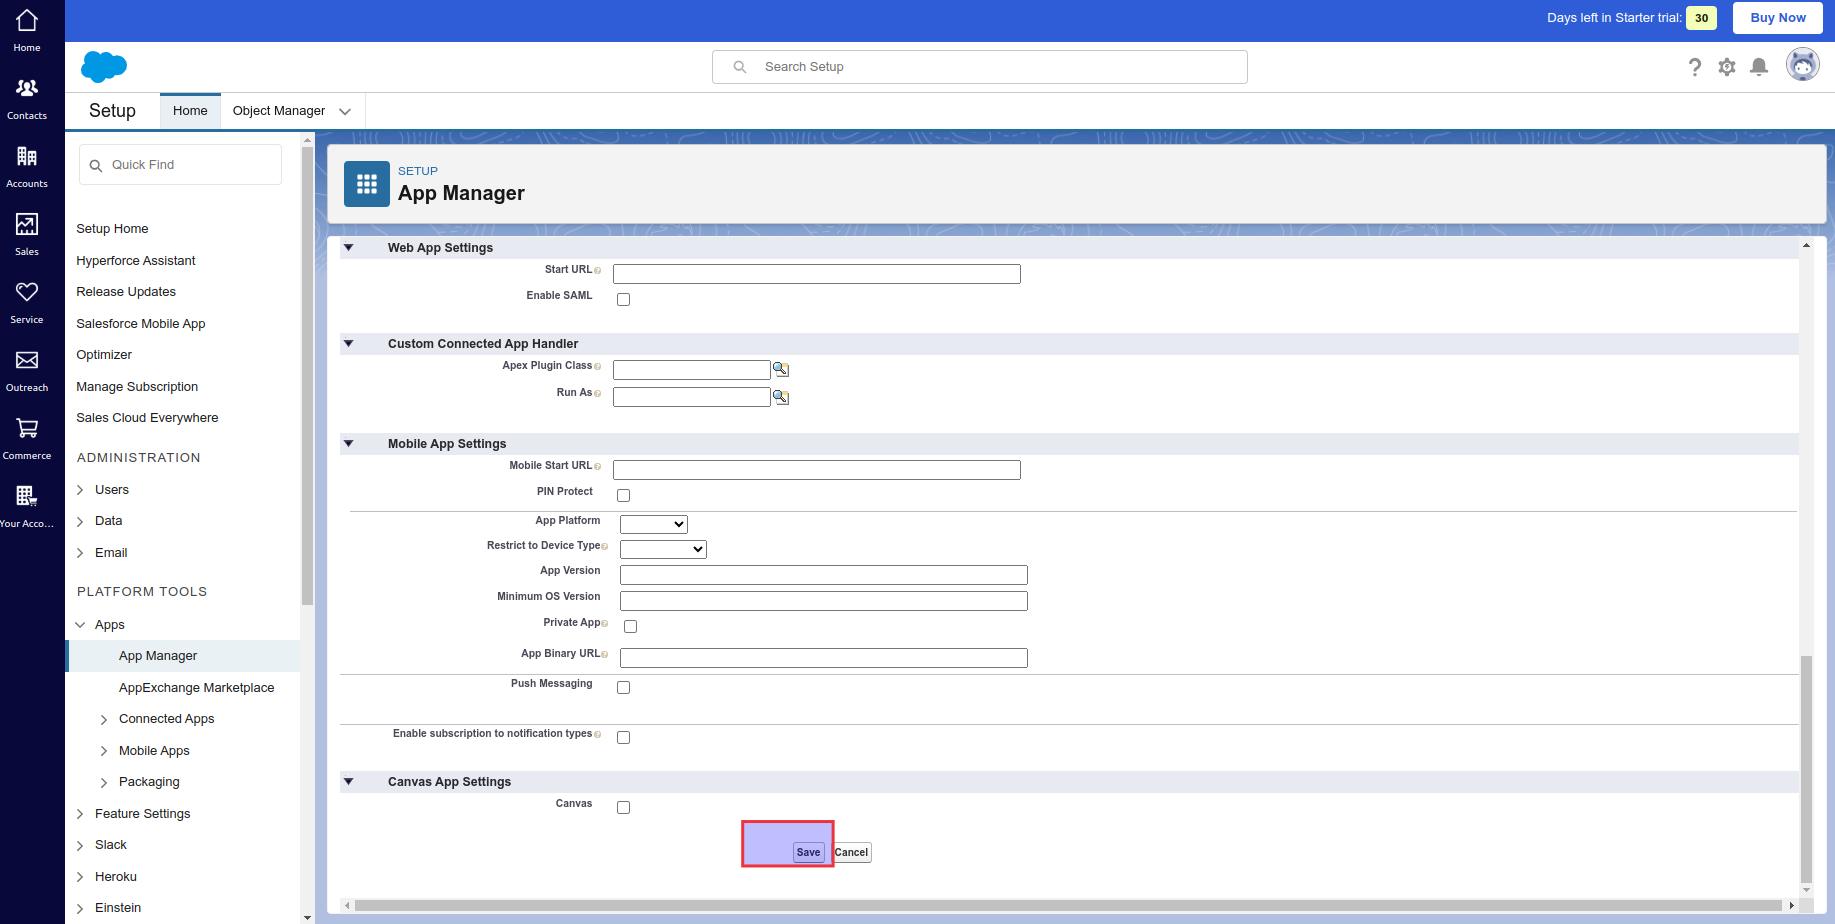
 3. Save and continue
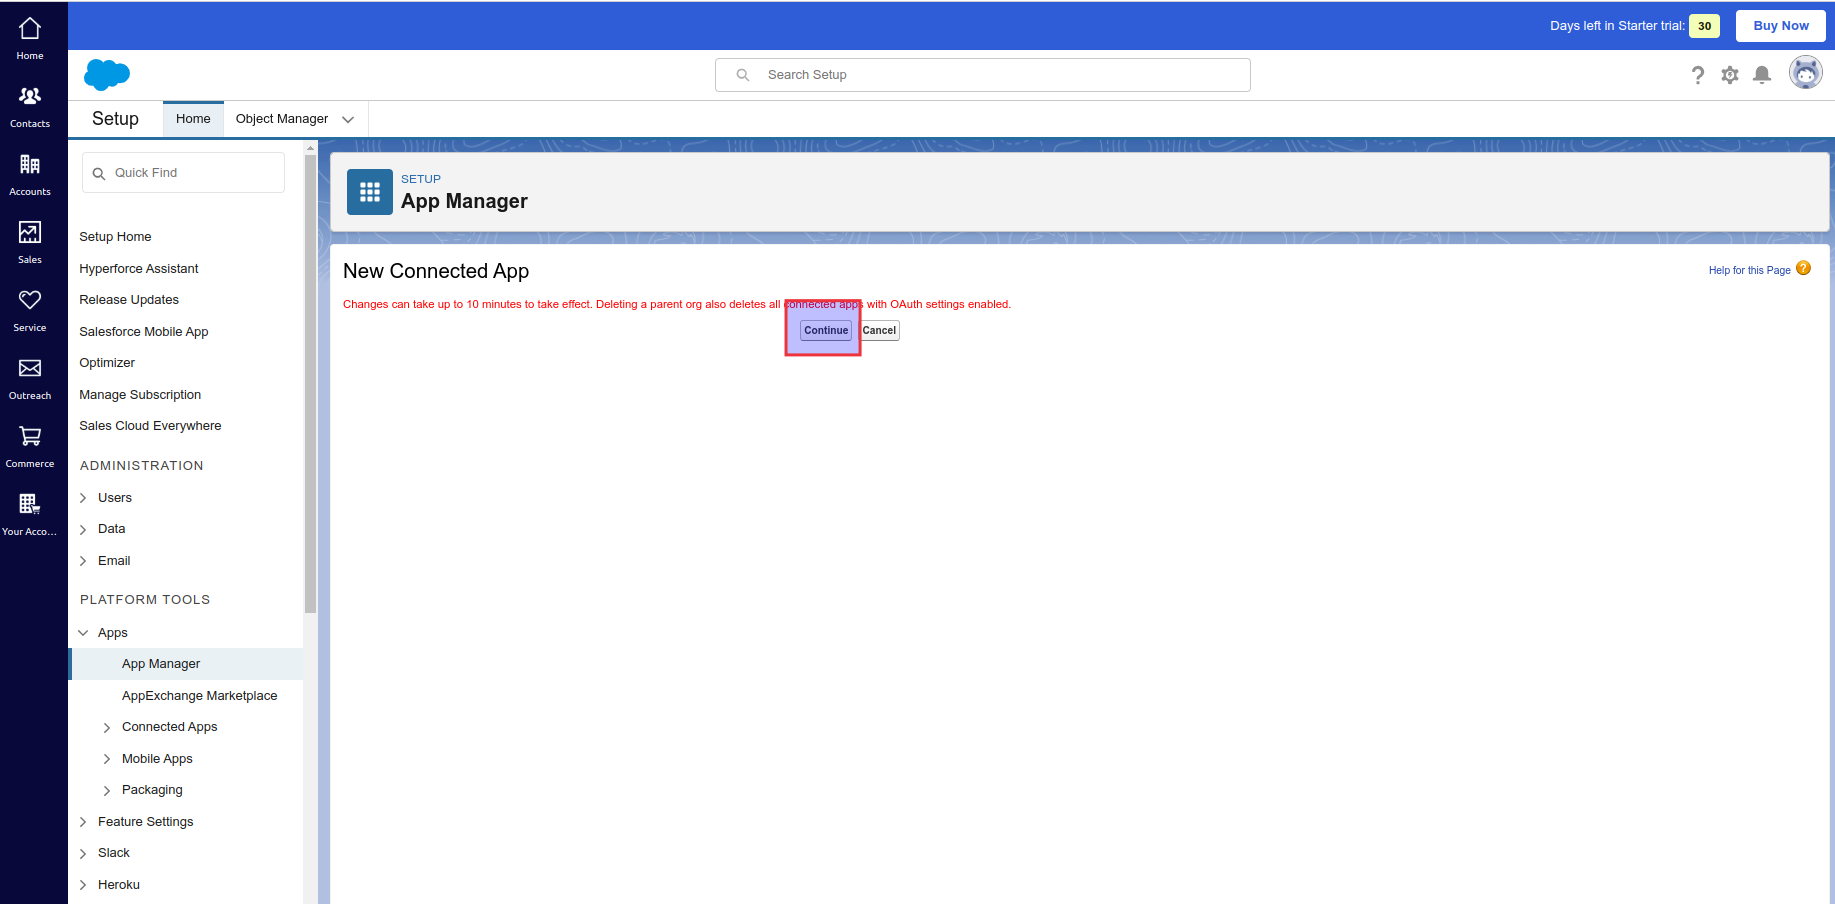 4. Click "Manage Consumer Details"
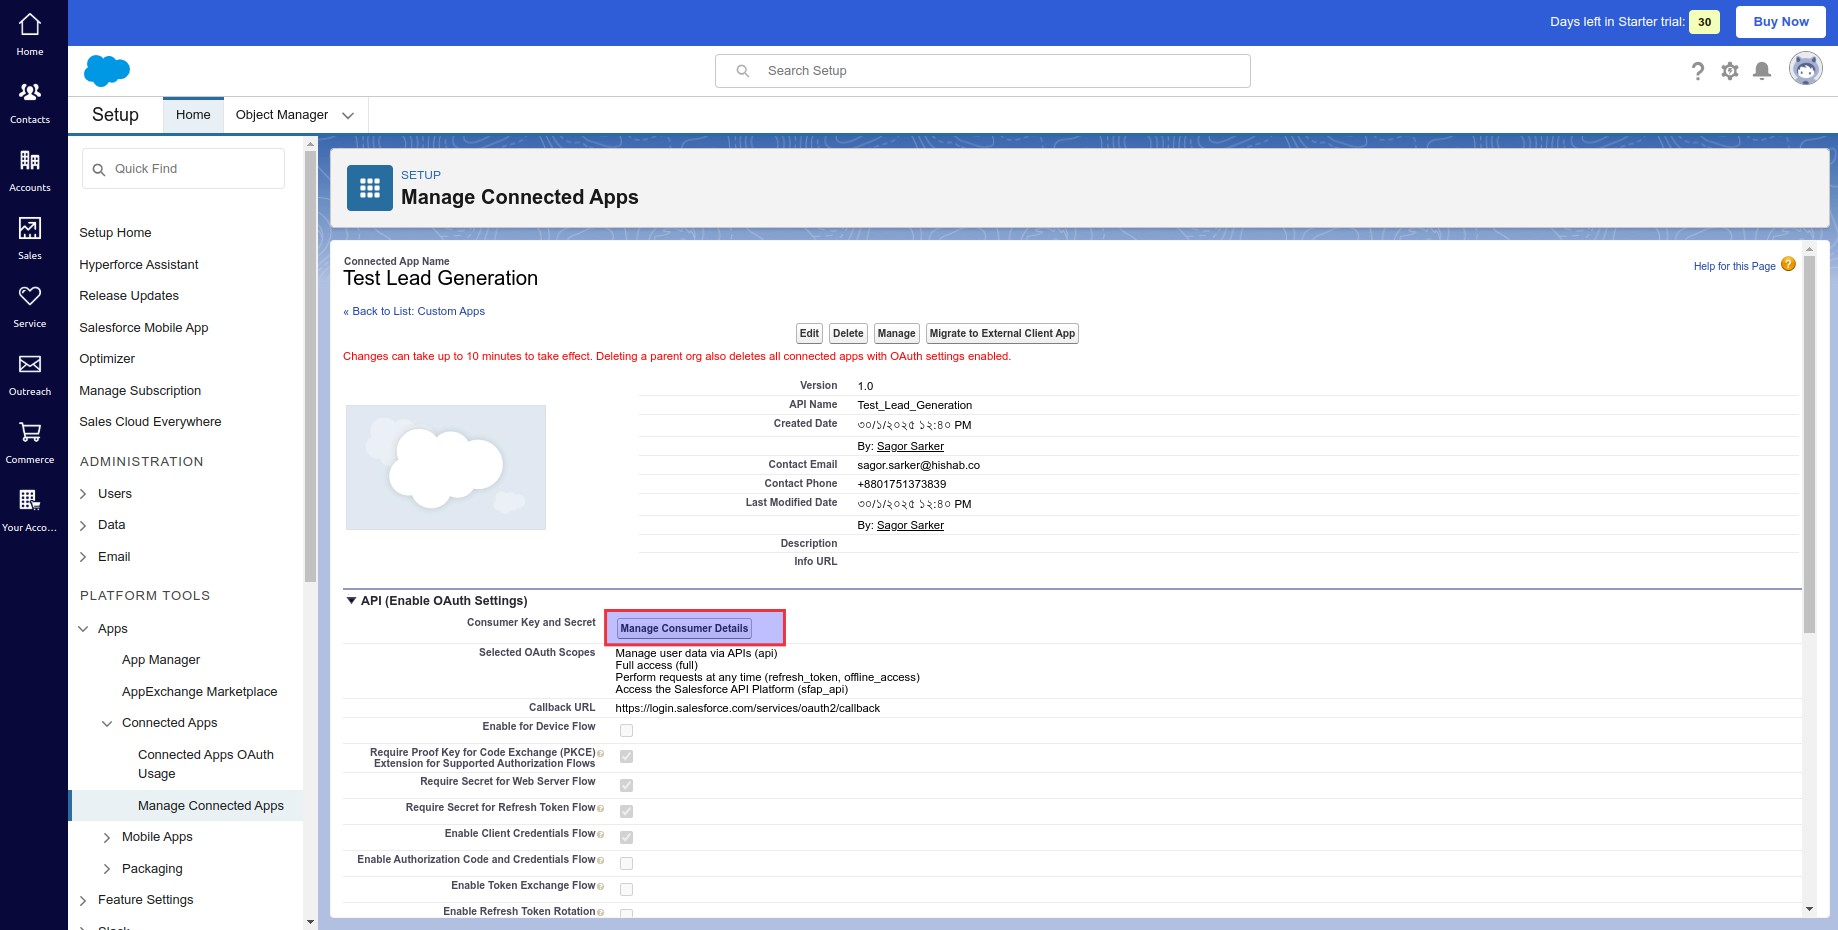 5. Complete verification process
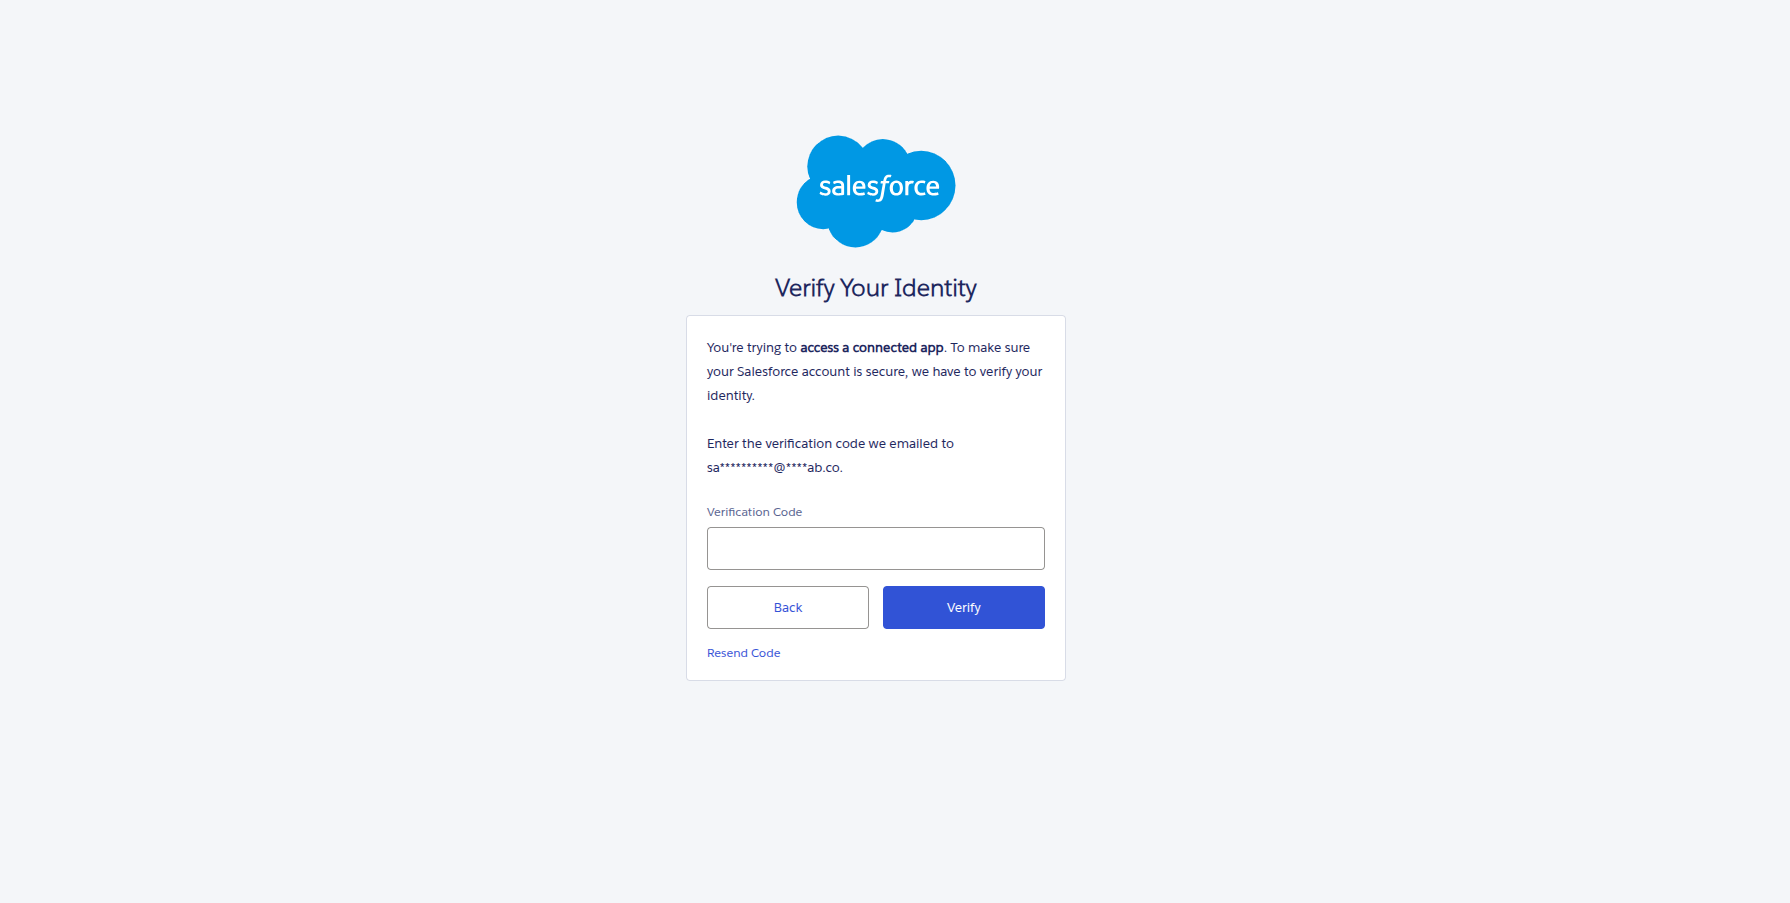 6. Save the following credentials:
* Consumer Key (Client ID)
* Consumer Secret
* Username
* Security Token
Store these credentials securely - you'll need them for the integration.
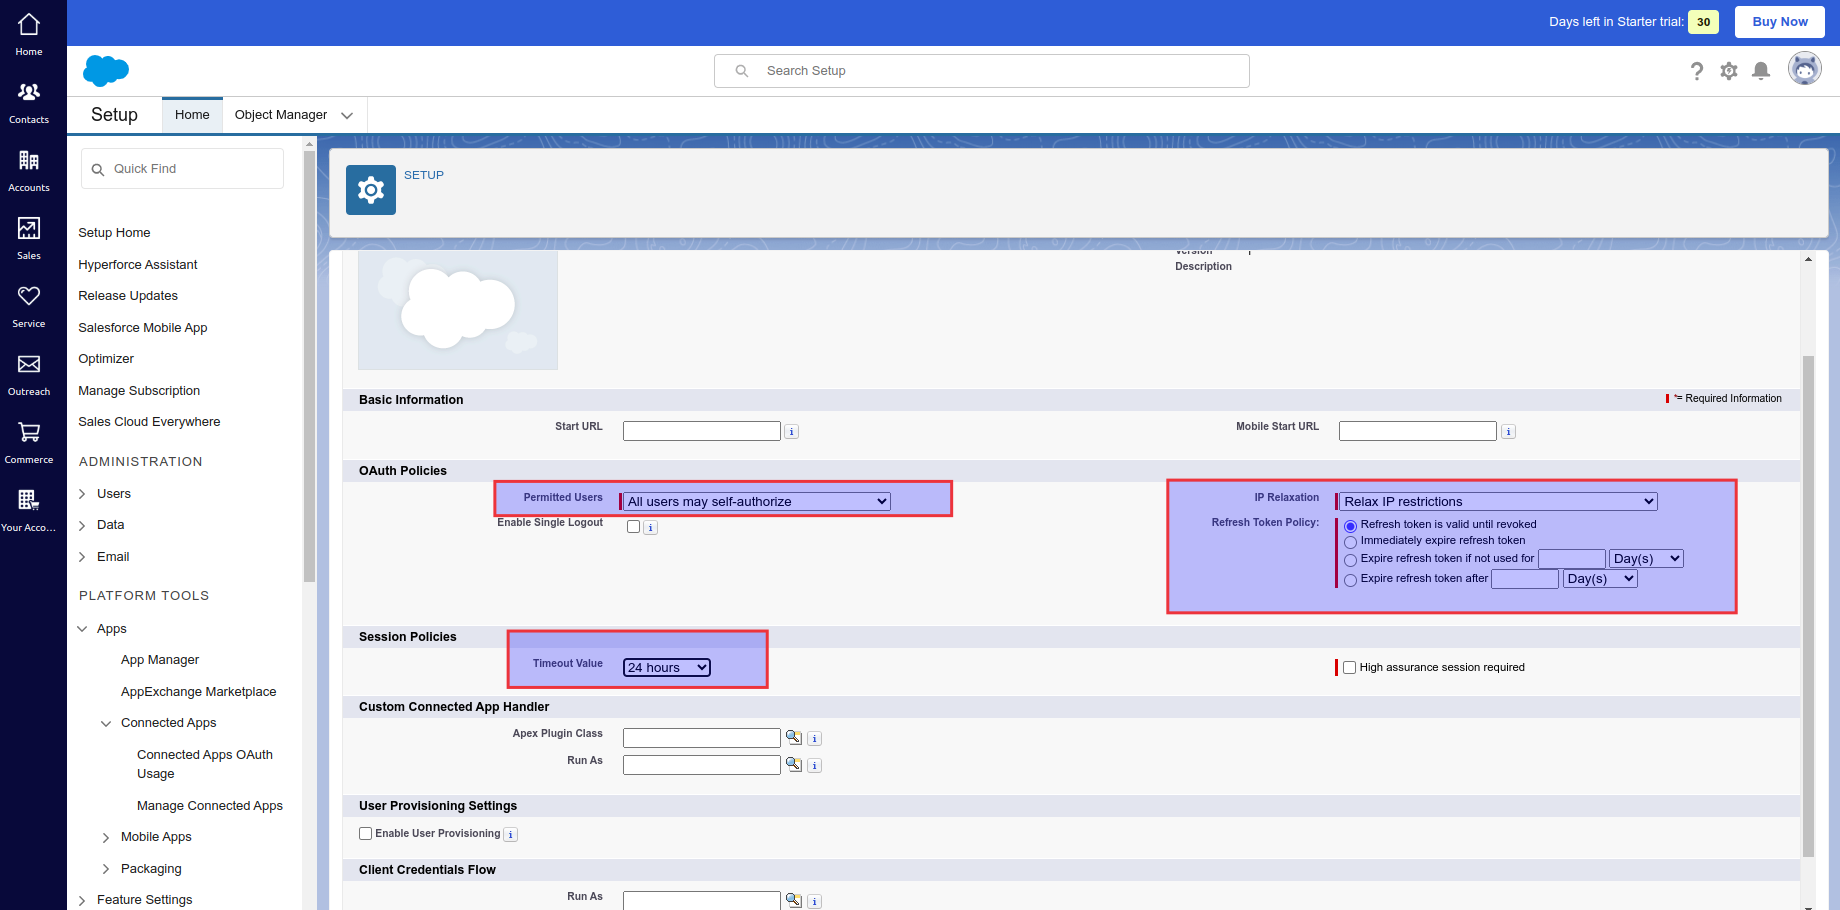
## Step 3: Update Policies
* Go to your app and click "Edit Policies"
6. Save the following credentials:
* Consumer Key (Client ID)
* Consumer Secret
* Username
* Security Token
Store these credentials securely - you'll need them for the integration.
## Step 3: Update Policies
* Go to your app and click "Edit Policies"
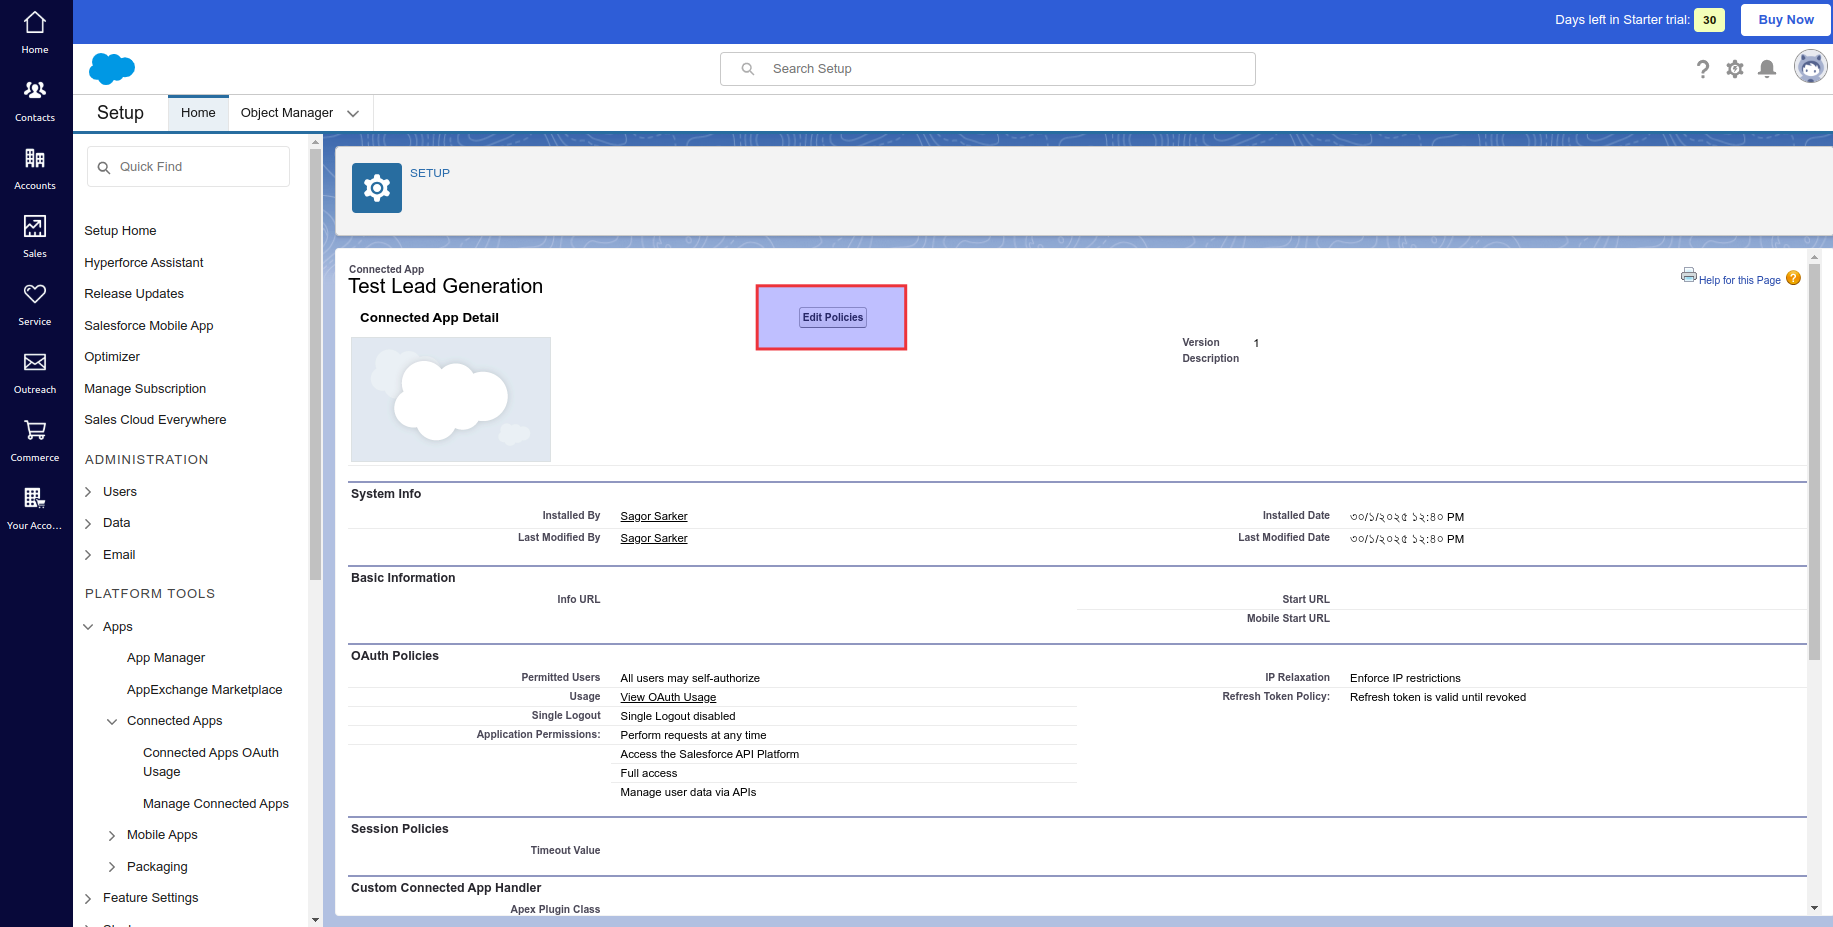 * Update the following marked policies:
 ## Step 4: Generate Access Token
* Use this curl command template to get your access token:
```bash theme={null}
curl -X POST "https://login.salesforce.com/services/oauth2/token" \
-d "grant_type=password" \
-d "client_id=CONSUMER_KEY" \
-d "client_secret=CONSUMER_SECRET" \
-d "username=YOUR_SALESFORCE_USER_NAME" \
-d "password=YOUR_SALSEFORCE_PASSWORD_AND_SECRET_KEY"
```
The password should be your Salesforce password immediately followed by your security token (no spaces).
* The response will include:
```json theme={null}
{
"access_token": "YOUR_ACCESS_TOKEN",
"instance_url": "https://your-instance.salesforce.com",
"id": "",
"token_type": "Bearer",
"issued_at": "",
"signature": ""
}
```
* Test your access token using and data sending CURL or Postman.
```bash theme={null}
curl -X POST "/services/data/v59.0/sobjects/Lead/" \
-H 'Authorization: Bearer ACCESS_KEY' \
-H "Content-Type: application/json" \
-d '{
"LastName": "Sarker",
"Company": "Hishab Technologies Limited",
"Email": "sagor.sarker@example.com"
}'
```
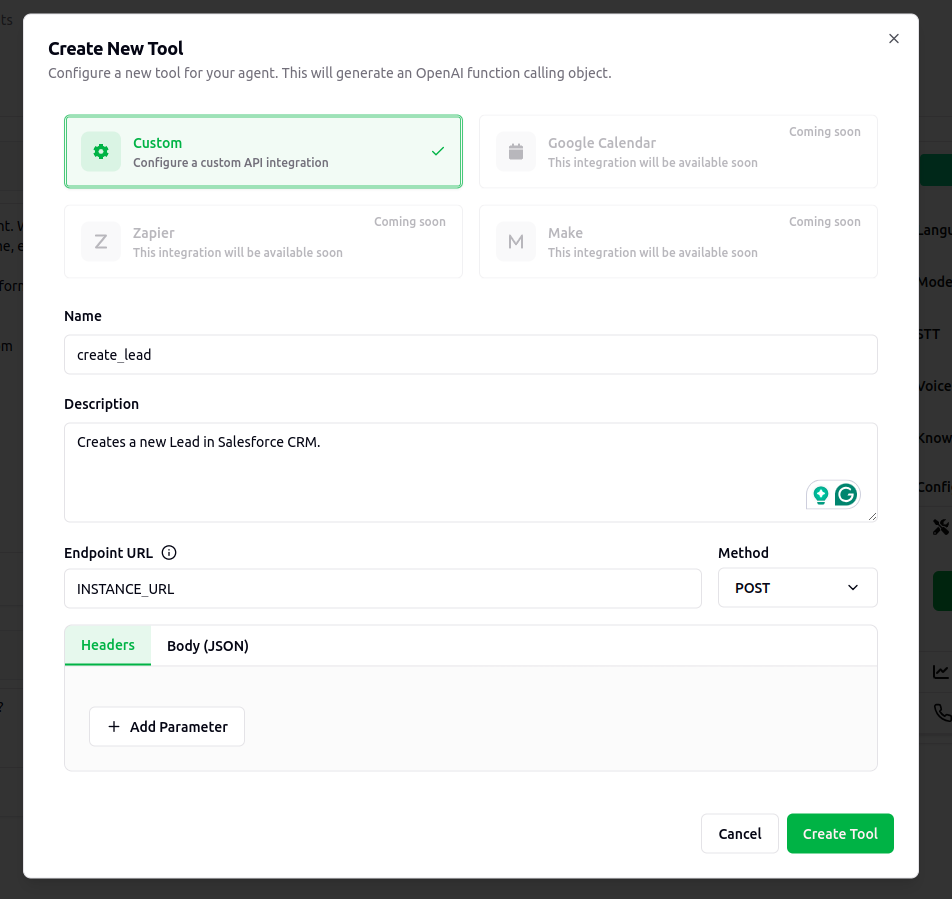
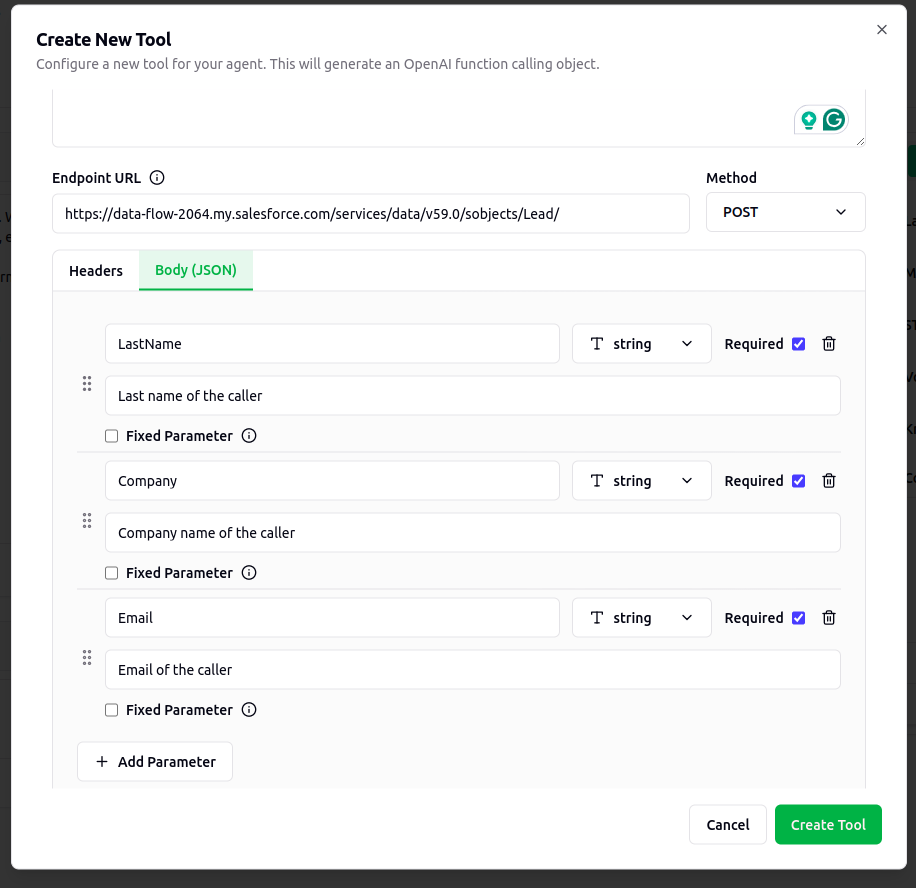
## Step 5: Create Custom Tool in Verbex
1. Go to "Add Tool -> Custom Tool"
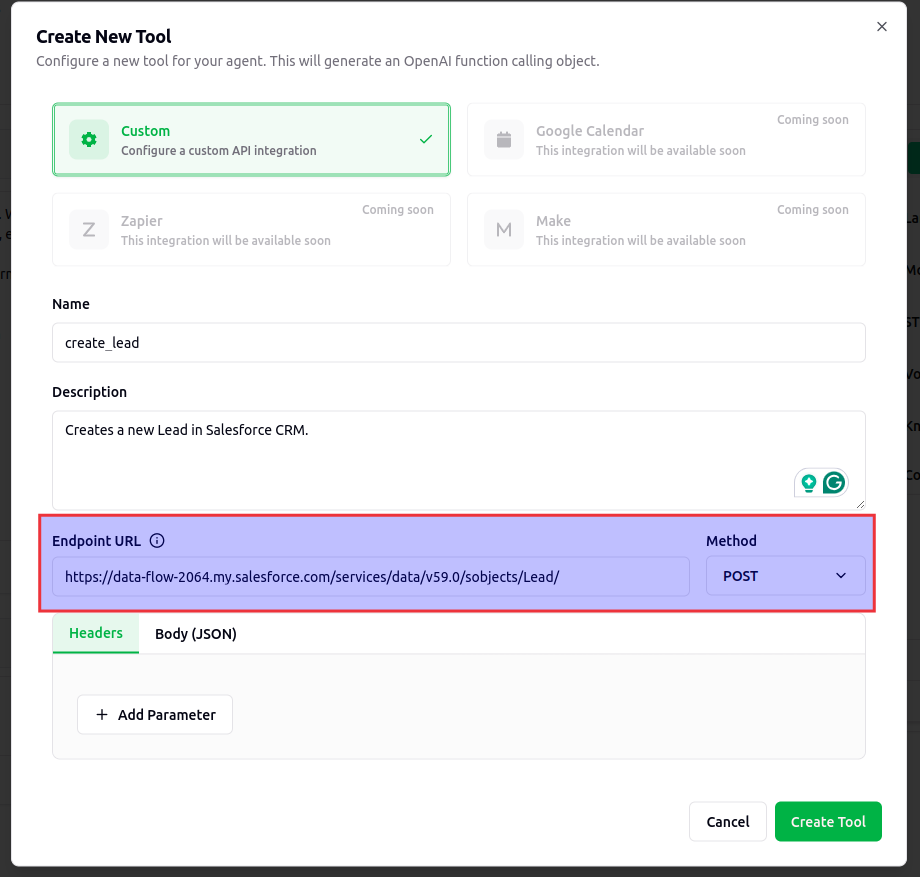
2. Configure the tool:
* **Name**: create\_lead
* **Description**: Create new leads in Salesforce
* **Endpoint URL**: \[Your Instance URL]/services/data/v59.0/sobjects/Lead/
* **Method**: POST
## Step 4: Generate Access Token
* Use this curl command template to get your access token:
```bash theme={null}
curl -X POST "https://login.salesforce.com/services/oauth2/token" \
-d "grant_type=password" \
-d "client_id=CONSUMER_KEY" \
-d "client_secret=CONSUMER_SECRET" \
-d "username=YOUR_SALESFORCE_USER_NAME" \
-d "password=YOUR_SALSEFORCE_PASSWORD_AND_SECRET_KEY"
```
The password should be your Salesforce password immediately followed by your security token (no spaces).
* The response will include:
```json theme={null}
{
"access_token": "YOUR_ACCESS_TOKEN",
"instance_url": "https://your-instance.salesforce.com",
"id": "",
"token_type": "Bearer",
"issued_at": "",
"signature": ""
}
```
* Test your access token using and data sending CURL or Postman.
```bash theme={null}
curl -X POST "/services/data/v59.0/sobjects/Lead/" \
-H 'Authorization: Bearer ACCESS_KEY' \
-H "Content-Type: application/json" \
-d '{
"LastName": "Sarker",
"Company": "Hishab Technologies Limited",
"Email": "sagor.sarker@example.com"
}'
```
## Step 5: Create Custom Tool in Verbex
1. Go to "Add Tool -> Custom Tool"
2. Configure the tool:
* **Name**: create\_lead
* **Description**: Create new leads in Salesforce
* **Endpoint URL**: \[Your Instance URL]/services/data/v59.0/sobjects/Lead/
* **Method**: POST
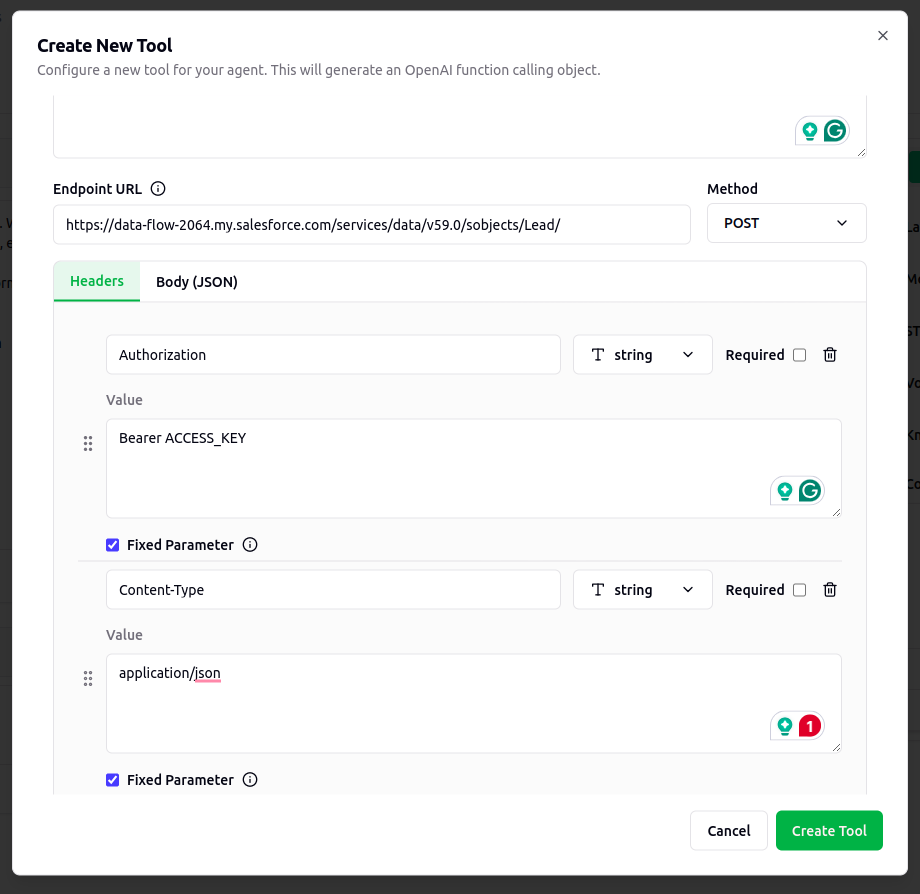
 3. Add Header Parameters:
* Authorization: Bearer \[Your Access Token]
* Content-Type: application/json
3. Add Header Parameters:
* Authorization: Bearer \[Your Access Token]
* Content-Type: application/json
 4. Configure Body Parameters:
```json theme={null}
{
"LastName": "string",
"Company": "string",
"Email": "string"
}
```
4. Configure Body Parameters:
```json theme={null}
{
"LastName": "string",
"Company": "string",
"Email": "string"
}
```
 Access tokens expire after 24 hours. In production, implement proper OAuth token management.
Everything is now set up. You can now test the tool in your AI Assistant. Like this you can connect any CRM tool to your AI Assistant.
# Best Practices
1. **Naming Convention**
* Use clear, descriptive names
* Follow a consistent pattern
* Include the system name
2. **Error Handling**
* Implement proper error catching
* Provide clear error messages
* Log issues for debugging
3. **Security**
* Regularly rotate credentials
* Use environment variables
* Implement rate limiting
4. **Testing**
* Test with sample data first
* Verify error scenarios
* Monitor integration health
# Monitoring and Maintenance
1. **Regular Checks**
* Monitor API usage
* Check for failed requests
* Verify data accuracy
2. **Updates**
* Keep API versions current
* Update authentication tokens
* Maintain documentation
For more details, refer to the [Salesforce API Documentation](https://developer.salesforce.com/docs).
Access tokens expire after 24 hours. In production, implement proper OAuth token management.
Everything is now set up. You can now test the tool in your AI Assistant. Like this you can connect any CRM tool to your AI Assistant.
# Best Practices
1. **Naming Convention**
* Use clear, descriptive names
* Follow a consistent pattern
* Include the system name
2. **Error Handling**
* Implement proper error catching
* Provide clear error messages
* Log issues for debugging
3. **Security**
* Regularly rotate credentials
* Use environment variables
* Implement rate limiting
4. **Testing**
* Test with sample data first
* Verify error scenarios
* Monitor integration health
# Monitoring and Maintenance
1. **Regular Checks**
* Monitor API usage
* Check for failed requests
* Verify data accuracy
2. **Updates**
* Keep API versions current
* Update authentication tokens
* Maintain documentation
For more details, refer to the [Salesforce API Documentation](https://developer.salesforce.com/docs).